If you’re searching for a fitness option to workout at home, on the beach, or even on a rooftop (like I do in the demos on this post) while training functional strength, building muscle, and developing a durable body, sandbag training is an excellent option — thanks to limitless exercises and the naturally functional nature. In this post you’ll learn the sandbag squat, a staple exercise for building muscle, full body strength, and hip/knee mobility in pursuit of your fitness goals.
Additionally, this exercise will allow you to move on to tens of other exercise and create hundreds of workouts that build muscle, train endurance and stamina, and build a bulletproof body while using the same weight throughout.
Read on to discover what the sandbag squat is, how to do it, and why it is essential in your workout routine.
WHAT IS A SANDBAG SQUAT?
The sandbag squat is an adaption of the staple weight lifting movement – the squat – either the back squat, front squat, split squat, single leg squat, overhead squat or any other variation.
The sandbag squat is done with a sandbag, instead of a barbell, dumbbell, or kettlebell. The movement consists of moving the sandbag to the preferred “Racked position” (where we will hold the sandbag in relation to our bodies), commonly either back Racked (held on the back for the sandbag back squat), front Racked (held on the upper chest for the sandbag front squad), or held overhead (for the overhead squat).
The sandbag squat, and the squat movement in general, is a valuable exercise as it trains functional strength and practical power in a motion used in daily life and needed into old age. Training the squat movement with a sandbag, instead of a barbell or traditional weights, allows us to train anywhere – at home, on the beach, or elsewhere – and adjust weight easily while receiving the benefits of training with a non-traditional weight…the sandbag.
SANDBAG SQUAT BENEFITS
The Benefits of training the squat movement include the following:
- Training for power (a combination of strength and speed) and strength in the legs and hips, while also exercising, training, and improving the full range of motion of our hips and knees.
- Conditioning a strong core (abs and lower back) and spinal erectors for injury resistance and a generally higher quality of life.
- A proper squat trains proper posture
SANDBAG SQUATS VS. BARBELL SQUATS
The benefits of training sandbag cleans, over barbell cleans, include the following:
- Cheap: Sandbags are relatively inexpensive compared to barbells and dumbbells
- Allows the freedom to workout anywhere: Simply empty your sandbag and refill in your new training location
- Versatility – Recreates all barbell, Kettlebell, and dumbbells movements + adds resistance to calisthenics with a single piece of fitness equipment

THE SANDBAG SQUAT VARIATIONS
- Sandbag Front squat / Front Rack Sandbag Squat
- Sandbag back squat / Back Rack Sandbag Squat
- Sandbag overhead squat
- Sandbag weight single leg squat

HOW DO YOU DO SANDBAG SQUATS?
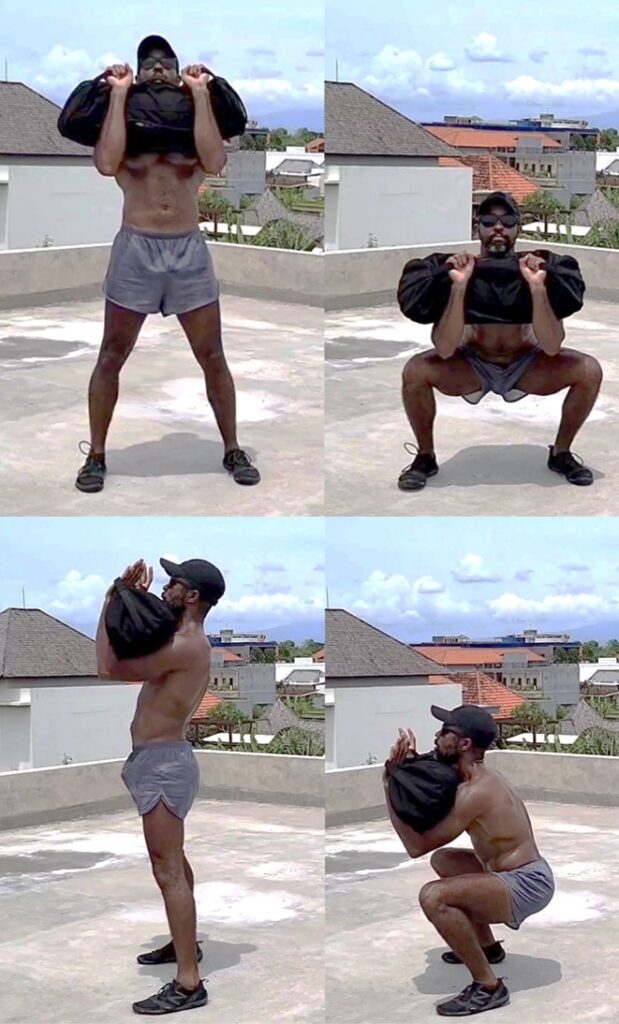
SANDBAG FRONT SQUAT
The sandbag front squat, also called the front rack sandbag squat, is the easiest sandbag squat to start with because the front rack position is easy to get into, just do a sandbag clean and you’re setup. The sandbag front squat is great because in addition to the legs, it more heavily works the lower back and shoulders than the back squat because the arms must actively be used to keep the bag in place. Additionally, the front squat will allow you to achieve a lower body position.
How to do the Sandbag Front Squat:
1. Start standing in the front racked position with feet places just wider than shoulder with and the core engaged with a neutral, supported spine.
2. Lower the body by driving the butt back and pushing the knees out so that they track over and in line with the feet
3. Lower at least until the crease of the hip passes the knee (lighten weight if this isn’t possible)
4. Reverse the movement and stand up, powering the movement with the glutes and pushing through the heels while maintaining core position and finishing with hips extended
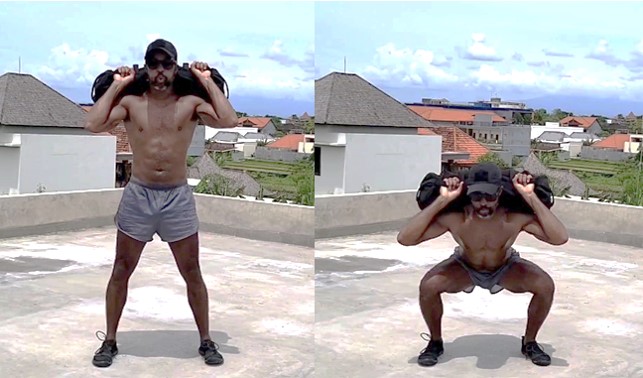
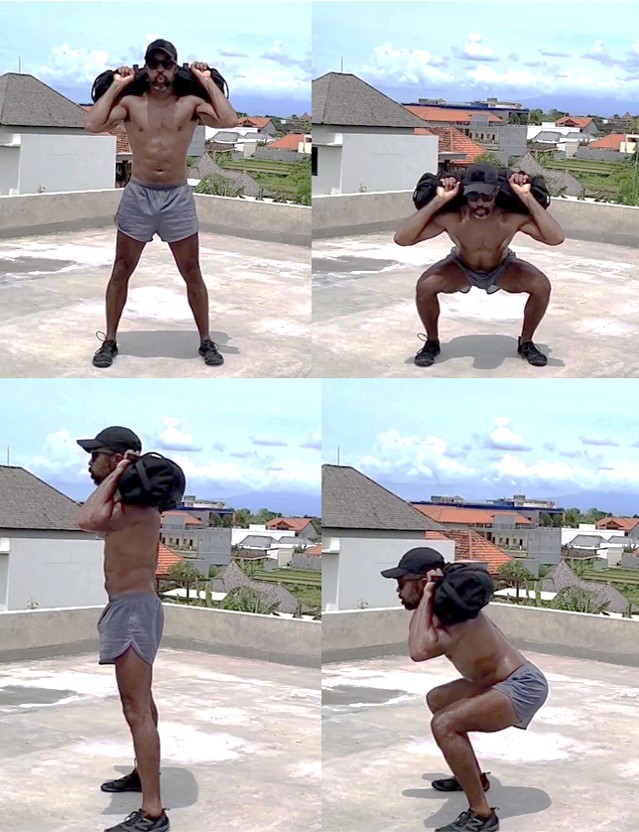
SANDBAG BACK SQUAT
The sandbag back squat is a true staple of sandbag training and allows us to train a core weightlifting movement without weights. The movement heavily trains the glutes, tests and encourages hip mobility, and trains (when properly) to maintain proper, healthy spinal position and an engaged core.
How to do the Sandbag Back Squat:
1. Start standing in the back Racked position with feet places just wider than shoulder with and the core engaged with a neutral, supported spine.
2. Lower the body by driving the butt back and pushing the knees out so that they track over and in line with the feet
3. Lower at least until the crease of the hip passes the knee (lighten weight if this isn’t possible)
4. Reverse the movement and stand up, powering the movement with the glutes and pushing through the heels while maintaining core position and finishing with hips extended
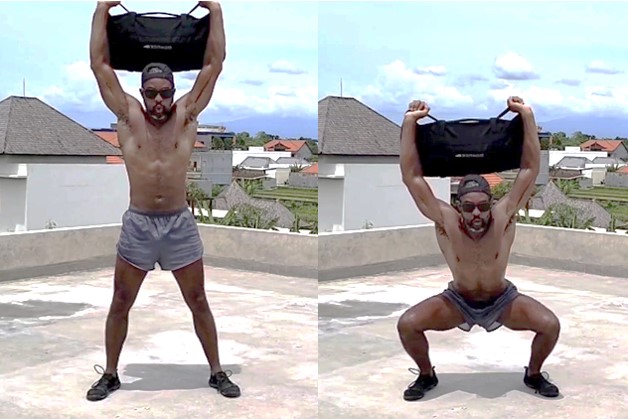
SANDBAG OVERHEAD SQUAT
The overhead squat is a perfect full body exercise movement as it is high difficulty and surprisingly hard work for little weight. Additionally, this movement trains and tests mobility in the hips and lower back as well as the shoulders and chest. The sandbag overhead squat is an excellent movement for full body fitness (strength and mobility), but be sure to warmup your hips and shoulders and initially start the movement at a very light weight. It is recommended to initially practice this movement with just a broomstick or PVC pipe.
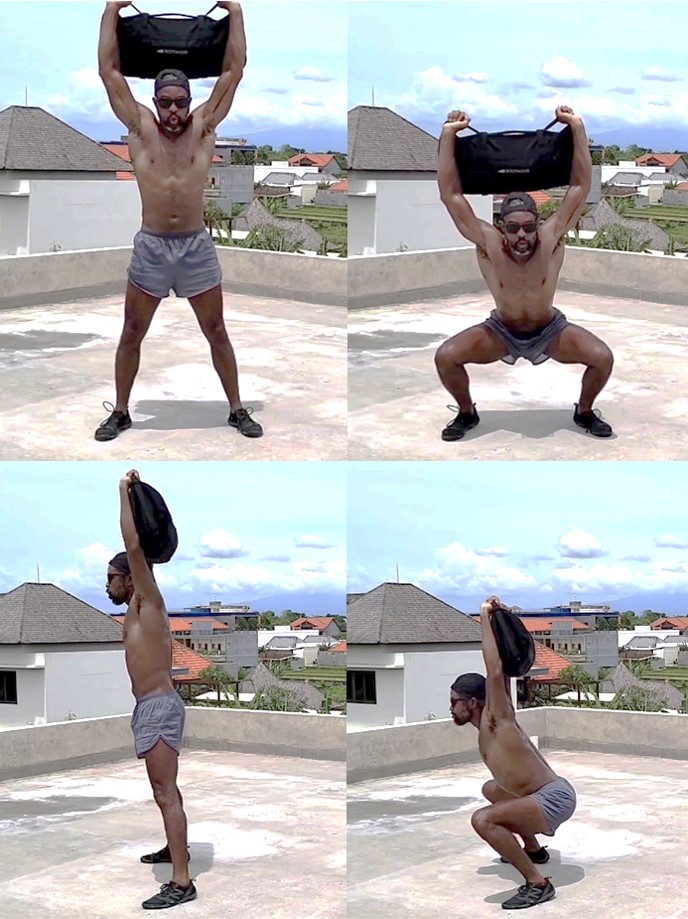
1. Start standing with the sandbag supported overhead with arms fully extended and with an engaged core and a neutral, supported spine.
2. Squat, driving your but backward, preventing your knees from passing your toes, and maintaining a neutral spine and engaged core. Drive the knees outward (tracking over the feet) during the movement.
3. Go down as far as your mobility will allow, maintaining an engage core, extended arms, and knees out.
4. Power up through the movement in reverse to hips fully extended and arms fully extended overhead
Note: Do not increase weight until you have developed the mobility to maintain proper form while the crease of the hip goes at least below the level of the knee
SANDBAG SINGLE LEG SQUAT
The single leg squat is nearly identical to the back squat except we are training one side at a time. The single leg sandbag squat is excellent for increasing difficulty when the maximum weight of your sandbag is limited because 1) the resistance encountered by each leg is roughly doubled compared to a normal back squat and 2) the act of balancing on a single leg heavily engages the supporting muscles and requires more muscular control (tension) than the doubled legged back squat.
1. Start standing with sandbag held in front, racked in the “Zercher position”, supported at the crook inside the elbow and with the opposite leg bent at the knee and held back for balance.
2. Perform the squat as you would a normal front racked sandbag squat, executing each repetition slower to maintain balance.
3. Go down as far as your mobility will allow
4. Power the upward movement with the glutes, ensuring the knee is pushed outward and following over the foot and the knee does not travel past the toe
5. Complete the movement by fully extending the hips.
SANDBAG SPLIT SQUAT (FORWARD)
The Sandbag Split Squat is great for mixing up training in a way that trains the glutes and hamstrings with higher than normal resistance in uncommonly trained position (one hip fully extended, one leg fully extended) allowing a great workout with low weight, and training flexibility/mobility/strength through range of motion in the process
How to do the Forward Sandbag Split Squat:
1. With the Sandbag Racked on your back, place one foot forward and one foot back with feet 1.5 to 2x shoulder width apart, both heels on the ground (in the starting position)
2. Bend the knees to lower the body, keeping the forward foot flat on the ground, and allowing the rear foot’s forefoot to make contact with the ground, keeping an engaged core and protected, neutral spine throughout.
3. Lower as far as your strength and mobility will allow while maintaining property technique
4. Stand and return to starting position, ensuring to fully straighten the forward leg and fully extend the hip of the rear leg.
SANDBAG LATERAL SPLIT SQUAT (SIDE SANDBAG LUNGE)
The Sandbag Lateral Split Squat, also called the Sandbag Side Lunge, is a perfect leg exercise for building lots of strength when your sandbag isn’t very heavy. The movement aims to put the weight of the sandbag, and upper body, on one leg at a time, increasing the resistance each leg most overcome in each repetition. Additionally, the movement trains the hips and biases inner leg resistance of the straightened leg in a way few other standard weightlifting exercises do, building healthier, more durable, and stronger hips and legs.
1. With the sandbag Racked on your back, spread feet 1.5x to 2x shoulder width apart. When squatting, squat toward one leg while fully extending the other, then alternate and repeat
MUSCLES WORKED IN THE SANDBAG SQUAT
– Legs (quads, and hamstrings)
– Glutes
– Core (abdominal, lower back)
Difficulty: Medium
The front sandbag squat biases tension on the quadriceps, and adds intensity to the core (lower back)
The back sandbag squat biases tension on the glutes
OTHER AREAS TRAINED
- Hip mobility
- Ankle mobility
- Practical strength in odd lifts, or movements common in daily life
SANDBAG SQUAT WORKOUT
This quick, sandbag squat workout delivers a medium intensity interval training workout with more focus on developing strength,, stamina,, and tone throughout the legs and glutes with just a sandbag
PART 1: PERFORM 3 ROUNDS OF THE FOLLOWING:
10 Sandbag Overhead Squats
10 Sandbag Front Squats
10 Sandbag Back Squats
Rest 90 seconds and Repeat
PART 2: PERFORM 3 ROUNDS OF THE FOLLOWING
15 Good Mornings
15 Single Leg Calf Raises
Rest 30 seconds and repeat
TIPS AND POINTS TO KEEP IN MIND WHILE YOU SANDBAG SQUAT
- Start the movement with an engaged core and neutral spine
- Throughout the movement, maintain an engaged core and neutral spine – if you feel your lower back change position, you’ve gone too low for your flexibility – ditch the weight
- Throughout the movement, keep your head up, chest up, and avoiding bending over the waist and letting your torso dip
- Get a good sandbag with handles in the right places
ALTERNATIVE SANDBAG EXERCISES AND SQUAT VARIATIONS
Bear Hug Squat: The bear hug squat, simply doing a front squat while bear hugging the weight instead of racking it, is the best option for a sandbag without handles
Sandbag Squat and Press / Sandbag Thrusters**
Sandbag Good Mornings**
Sandbag Good Mornings are an excellent exercise for using light weight to heavily train strength and mobility in the posterior chain, and strength and health in the lower back.
SANDBAG SQUAT FAQ
Are sandbag squats effective? Is sandbag training effective?
Sandbag squats are just as effective as barbell squats and actually build more practical, functional strength than traditional weights.
As sandbags are soft and the weight shifts, this movement naturally trains stabilizer muscles that are trained when lifting with weights that don’t move at all.
Additionally, to setup for a front squat, back squat, or overhead squat, we are forced to lift the sandbag from the ground, training other functional movements like cleans, presses, and deadlifts that are essentially for a healthy life, and we train that lightly and passively throughout every workout.
Sandbag training is ultimately effective because it trains the movements we use in the gym, with the context – from the ground to the carry position – we are likely to encounter in everyday life.
How much weight should I use for sandbag training?
Women should start training with a sandbag that weights 20lbs to 40lbs. Men should begin with a sandbag between 30lbs and 60lbs.
You know how to Sandbag Squat…what next?
Learn the Sandbag Clean to add more exercises to your sandbag training arsenal
Consider checking out the GORUCK Sandbag, my favorite sandbag for training in the coming year to properly equip your home gym.
Next, check out these 31 sandbag workouts.
Return the Sandbag Training Blog
.

.
ABOUT THE AUTHOR
Carlos Grider launched A Brother Abroad in 2017 after a “one-year abroad” experiment turned into a long-term life strategy. After 65+ countries and a decade abroad, he now writes about FIRE, personal finance, geo-arbitrage, and the real-world logistics of living abroad—visas, costs, and tradeoffs—so readers can make smarter global moves with fewer surprises. Carlos is a former Big 4 management consultant and DoD cultural advisor with an MBA (UT Austin) and Boston University’s Certificate in Financial Planning. He’s the author of Digital Nomad Nation: Rise of the Borderless Generation and is currently writing The Sovereign Expat.