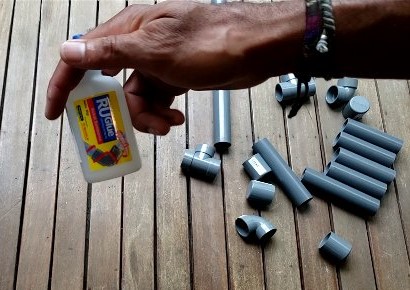
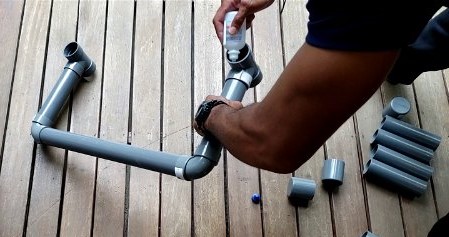
With so many home fitness gear options, deciding what equipment is essential and purchasing it all without spending too much money can feel tough. Luckily for us, PVC parallettes can enable hundreds of great exercises that build strength, muscle, and bulletproof abs and core. Even better, we can easily and quickly build a tough, durable set of PVC parallettes at home in less than 25 minutes and for less than $25.
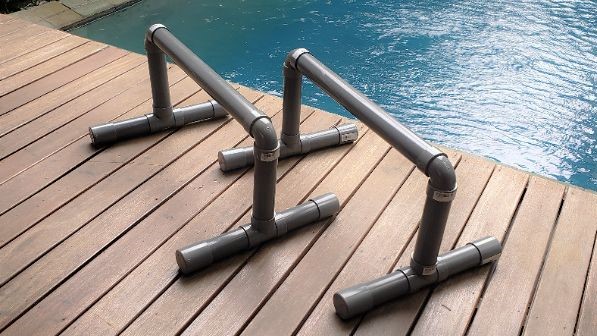
In this quick guide, I’ll share easy to follow steps and instructions and everything you need to know for how I’ve built a great pair of parallettes from PVC pipe. Once we have your parallettes built, I’ll share the advanced upper body calisthenics & parallettes exercises, and parellette workouts I’ve used to eliminate going to the gym and get a solid workout at home.

A QUICK OVERVIEW
HOW TO BUILD PVC PARALLETTES
- Gather your tools (PVC pipe and fittings, a PVC cutter, measuring tape, and PVC pipe glue).
- Measure, mark, and cut your PVC pipe for the legs
- Test assemble your parallettes
- Apply glue to the pipe and joints and assemble your parallettes
- Allow your parallettes to dry for 24 hours before us
Frequently asked questions about parallettes
Click here or continue reading for detailed pictures, materials list, and instructions for how to build your parallettes from PVC and reasons why PVC is the way to go when making parallettes

The following article may contain affiliate links

HOW TO BUILD PVC PARALLETTES
QUICK STEPS, TOOLS, AND MATERIALS
- Time: 25 Minutes
- Cost: ~$25
- Difficulty Level: Very easy
MATERIALS REQUIRED
- 10 feet of 1.5 inch PVC Pipe (Schedule 80)
- 4 x 1.5 inch Elbow Fittings
- 4 x 1.5 inch T-Fittings
- 8 x 1.5-inch end caps
- 1 x small container of PVC pipe glue
Note: Ensure all of the pipes and joints/fittings are 1.5 inches and ideally schedule 80.
TOOLS REQUIRED
- PVC cutter or saw
- Tape measure
- Permanent marker

STEP BY STEP INSTRUCTIONS FOR BUILDING YOUR PVC PARALLETTES
STEP 1: GATHER YOUR MATERIALS AND TOOLS
PVC PARALLETTE MATERIALS
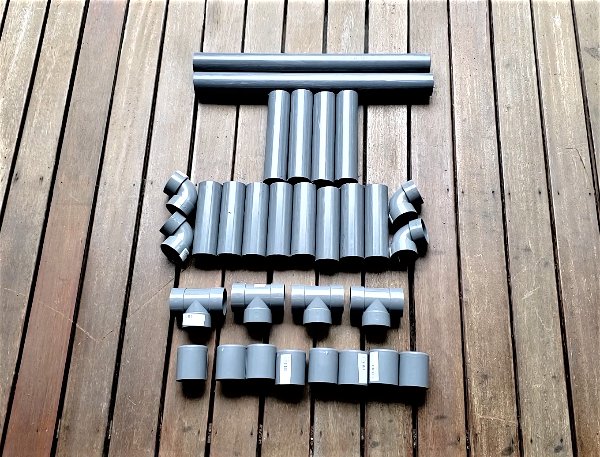
- 10’ of 1.5 inch, Schedule 80 PVC pipe(the grey kind) to cut the following shorter pieces for your parallettes
- 4 x 1.5-inch 90-degree elbow fittings(1.5 inches wide, Schedule 80 PVC pipe fitting)
- 4 x 1.5-inch T-Fittings(1.5 inches wide, Schedule 80 PVC pipe fitting)
- 8 x end caps(1.5 inches wide, Schedule 80 PVC pipe fitting)
- 1 x Small Container of PVC pipe glue:This PVC pipe glueor something similar will work well
LIST OF TOOLS
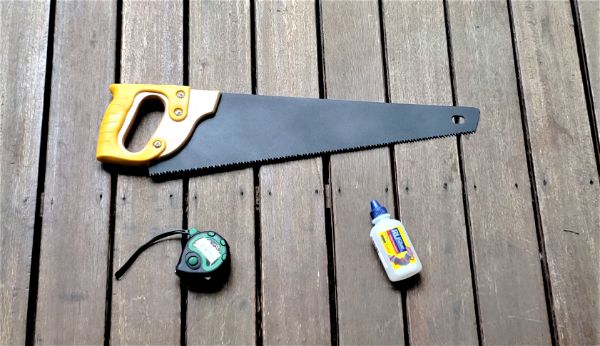
- PVC Cutter or Saw: Virtually any saw will suffice, but a PVC cutter is cheap and makes life easy for other projects
- Tape Measure or Ruler
- Permanent marker or Pen (for marking measurements)
Note: The following materials are linked above to Amazon to see the materials you’ll need or easily have the items delivered to your home.
STEP 2: MEASURE AND CUT YOUR PVC PIPE

In this step, measure each piece twice before cutting to be on the safe side. Using your measuring tape/ruler and pen, measure, mark, and cut one piece of PVC pipe at a time of each of the following pieces of PVC pipe
| PVC PIPE LENGTHS TO CUT |
|---|
| 2 x 20 inches of PVC Pipe (for the 2 horizontal handles) |
| 4 x 8 inches of PVC Pipe (for the 4 vertical support legs) |
| 8 x 6 inches of PVC Pipe (for the 8 horizontal feet) |
The total lengths of these pieces add up to 10 feet, making a 10-foot length of 1.5-inch Schedule 80 PVC pipe perfect for this project
STEP 3: TEST THE FIT AND SYMMETRY OF THE PARALLETTES
Before gluing the pieces of your parallettes, ensure to do a test assembly. In the test assembly, check that 1) the pieces do fit together and that 2) the height of both of your parallettes are the same.
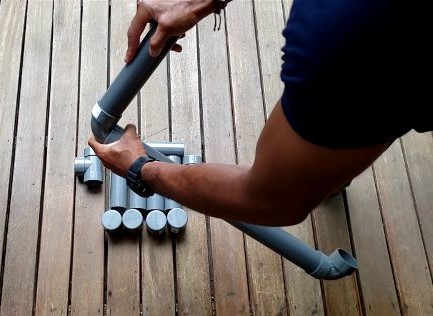
If the parallette handles’ height is uneven, cut a little from the vertical support PVC pipes of the taller parallettes until both parallettes are even.
Additionally, test the height of the parallettes to make sure it fits your needs. You should be able to do a tucked pass-through from an L- sit to a tucked planchet without your feet touching the ground. This height allows for a slew of strength-building parallettes exercise variations. If you’re exceptionally tall and need a little extra height, feel free to add an inch or two.
Then, proceed to step 4 and gluing.
STEP 4: GLUE AND ASSEMBLE THE PIECES OF YOUR PARALLETTES
After you’ve tested the fit, apply PVC pipe glue around the inner rim of one PVC joint at a time and then place the respective length of pipe into the joint. Be sure to adjust the pipe’s positioning to the correct position before moving to the next step.
STEP 5: ALLOW TO DRY FOR 24 HOURS
Though your glue and the parallettes may feel dry and firm after about 30 minutes, I recommend letting the glue dry for a full 24 hours before use. This is not only for initial safety but also for the durability and longevity of your parallettes.

Allowing your parallettes and the connections to dry for a full day before putting them under pressure will ensure better curing and attachment between the glue and joints.
OPTIONAL STEP: PAINT WITH PRIMER
These PVC parallettes are nearly perfect, but because the handles are made of non-porous plastic, the handles may become slightly slippery if your hands are too moist. To counter this, consider spray painting the parallettes with a primer to give a non-skid surface that gives ample grip while still being easy on the hands.
OR CHECKOUT THE FULL VIDEO TUTORIAL FOR STEP BY STEP

DOES YOUR HOME GYM NEED PARALLETES? ABSOLUTELY. HERE’S WHY…
If you are interested in creating a cheap yet versatile home gym, advanced calisthenics and the equipment to do them should be part of your home gym and your routine.
TOP REASONS TO ADD PARALLETTES TO HOME GYM AND YOUR WORKOUT ROUTINE
- Allows high-intensity upper body exercises at home
- Complements gymnastics rings or a suspension trainer and resistance bandsfor a complete home gym
- Builds core strength, increased mobility, joint health, and balanced development
- Allows an extended range of motion in calisthenics – more strength, mobility, and flexibility
- Lightweight and easy to move around: Take them to the park for a workout
Parallettes are a perfect addition to home gyms, perfect as they make beginner exercises and progressions to advanced calisthenics – deficit handstand push-ups, 90-degree push-ups, L-sits – possible to build strength, muscle, and tone like few other exercises at home.

ARE PVC PARALLETTES RIGHT FOR YOU COMPARED TO WOOD AND METAL PARALLETTES?
Whether PVC or wood parallettes are best for you depends 1) on your budget as wood parallettes are more expensive than PVC parallettes and 2) how sweaty your palms are. In actuality, the difference between wood parallettes and PVC parallettes is negligible, making the cost savings worth the small sacrifice. Additionally, a light coat of primer paint on the PVC parallettes can equal out the small advantages wood parallettes have over PVC parallettes.
BENEFITS OF PVC PIPE FOR PARALLETTES
- Extremely Strong: 1000+ lbs tensile strength for Schedule 80 PVC Pipe
- Very durable: will last for a decade+ of hard use
As a DIY project for home gyms, PVC parallettes are nearly perfect. These parallettes are cheap, easy to make quickly, extremely strong, and will last for well over a decade.
But how do PVC parallettes compare to wood parallettes and wood parallettes?
WOOD PARALLETTES VS. PVC PARALLETES
Wood parallettes could be considered slightly better than PVC parallettes, simply because wood’s porous nature allows for better grip when wet or sweaty. On the other hand, the PVC parallettes will need to be wiped off as your hands become sweaty.
However, the porous nature of wooden parallettes makes PVC parallettes a more sanitary option. PVC parallettes are easier to wipe clean and sanitize as no sweat or bacteria is soaking in, as is the case with wood.
Ultimately, the difference between wood parallettes and PVC parallettes is negligible, with PVC parallettes being much easier and cheaper to make at home. Between wood and PVC parallettes as a DIY project, PVC is the better bet.
If you are interested in wood parallettes, I recommend simply purchasing a pair such as these tall, wooden handled parallettes.
METAL PARALLETTES VS. PVC PARALLETTES
I absolutely recommend PVC parallettes over metal parallettes. The primary reason why I prefer PVC parallettes over metal is that when you inevitably slip and bump the parallettes, from a push-up, a dip, or a handstand, PVC will hurt much less. The flex and give in the PVC will reduce the pain a lot more than you think. Trust me on this one.
Additionally, metal is cheaper and much easier to cut and assemble.

WHAT NEXT: THE ESSENTIAL PARALLETTE EXERCISES
Now that you’ve completed your parallettes, it’s time to put them to use. The number of exercises we can do with parallettes is nearly limitless whether you’re a beginner or advanced. Use the lists below to target exercises for your level.
PARALLETTE EXERCISES FOR BEGINNERS
- Deep Push Up
- Tucked Planche Push-Up
- 90 Degree Pike Push Up
- Piked Push-Up
- Deficit Handstand Push Up And Deficit Pike Push Up
- Dip
- Frog Stand
- Tucked Planche
- Tucked L-Sit
- Handstand Balance
- Knees To Chest
- Tucked Shoulder Press Hold
- Tucked Planche To L-Sit
ADVANCED PARALLETTE EXERCISES
- 90 Degree Push-Up
- Deficit Handstand Push-Ups (Free Or Wall Assisted)
- Shoulder Press
- L-Sit, 1 Leg L-Sit, Straddle L-Sit, Elevated L-Sit
- L-Sit + Dip
- Planche
- Beat Arm Planche

PVC PARALLETTES FAQ
- Are PVC parallettes strong enough? How strong are PVC parallettes?
- Why do you use a 1.5 inch PVC pipe instead of a 1-inch pipe? Will a 1-inch pipe suffice?
- Why Schedule 80 pipe? Will Schedule 40 (white PVC pipe) suffice for parallettes?
- Are PVC parallettes worth it?
- How do you make PVC pipe parallettes?
- How tall should Parallettes be?
Are PVC parallettes strong enough? How strong are PVC parallettes?
Absolutely. 1.5-inch Schedule 40 PVC pipe has a tensile breaking strength of 954lbs. When proper PVC pipe cement is used, the connections “weld” together, becoming stronger than the pipe itself. Schedule 80 PVC pipe has a tensile breaking strength of 1225lbs.
Why do you use a 1.5 inch PVC pipe instead of a 1-inch pipe? Will a 1-inch pipe suffice?
From my experience, a 1.5 inch PVC pipe gives a perfectly level rigidity without flex during powerful calisthenics movements, while the grip around 1.5-inch pipe is perfect for wrapping one’s hands around.
Why Schedule 80 pipe? Will Schedule 40 (white PVC pipe) suffice for parallettes?
From my experience, additional rigidity without flex offered by Schedule 80 PVC pipe over Schedule 40 PVC during powerful calisthenics movements adds a level of comfort and safety, ultimately helping me enjoy my parallettes workouts more. However, Schedule 40 pipe is more than strong enough and will suffice.
Are PVC parallettes worth it?
Definitely. A single pair of DIY PVC parallettes will cost roughly $25 and allow the user to do advanced calisthenics and recreate weightlifting and resistance movements. These “recreated movements” include the bench press, clean and press movements, and advance core movements such as the L-Sit and I-sit. Paired with a good suspension trainer or gymnastics rings, this $25 essentially allows us to ditch our gym and weights.
How do you make PVC pipe parallettes?
- Gather your tools (a PVC cutter, measuring tape, and PVC pipe glue) and materials (10’ of 1.5 inch schedule 80 PVC pipe, 4 elbow joints, 4 t-joints, and 2 end caps.
- Measure, mark, and cut your PVC pipe for the length and legs of your parallettes
- Test assemble your parallettes
- Apply glue to the pipe and joints and assemble your parallettes
- Allow your parallettes to dry for 24 hours before use
How tall should Parallettes be?
Parallettes should be ~8 inches tall minimum but may need to be taller to allow you to perform apass through bringing tucked feet under your body from an L-sit. If you cannot perform a pass through at your parallette’s current height, making the vertical legs taller before permanently gluing


ABOUT THE AUTHOR
Carlos is a nomad, slow traveler, and writer dedicated to helping others live abroad and travel better by using his 7+ years of experience living abroad and background as a management consultant and financial advisor to help other nomad and expats plot better paths for an international lifestyle. Click here to learn more about Carlos's story.

