Experiences make travel the extraordinary journey it is, and adventurous experiences add even more to that journey. Freediving and know the essential freediving breathing techniques and breath-holding techniques have the potential of adding a whole new layer of pleasure and adventure to your travels.

Being able to safely and efficiently move through the sea while holding your breath for 3 to 4 minutes empowers you to explore tropical and beach laden paradises below the surface, without the cumbersome gear and rules of SCUBA diving.
In this freediving manual for travelers, we’ll get you started practicing the essential techniques in freediving to safely get your breath-hold up to 3 to 4 minutes while introducing you to the techniques and tools to dive 20 to 25 meters (60 to 75 feet) below the ocean’s surface.
For adventurous travelers trotting the globe and exploring the aquatic paradises of Southeast Asia and Latin America, these freediving breathing techniques and skills allow you turn any snorkel excursion into a mini-SCUBA diving adventure. All using the greatest tool at your disposal – your own body – and maybe a mask a snorkel.
Read on for a full introduction to freediving and a practical exercise to get your breath hold to 3 minutes in the next 2 days.

CONTENTS OF THIS QUICK FREEDIVING MANUAL
- What is freediving
- How Freediving can enhance how you explore
- 15 Things You Need to Know About Freediving to Get Started
- The Purpose of this Freediving Manual
- Important Notes on Freediving
- The Freediving Process
- Freediving Breathing and Breath holding Techniques
- Freediving Breathing Techniques Practical Exercise
- Equalization
- Duck Diving
- Freediving Equipment
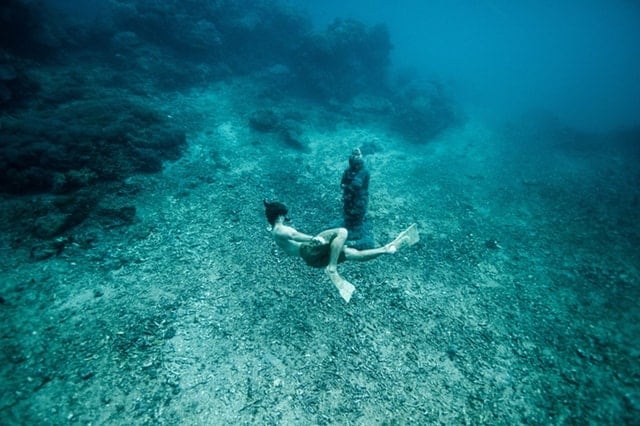
WHAT IS FREEDIVING
Imagine tapping into your primal ability to change how your body functions when you hit the water, just as aquatic mammals like dolphins, sea lions, and whales use to survive and thrive in the water.
This award-winning short “One Breath Around the World” captures all of the beauty of freediving in less than 10 minutes
Imagine being able to hold your breath and swim so efficiently that you can dive down to 75 feet, 90 feet, or even further with no breathing equipment and on a single breath.
Imagine that single breath lasting for 4 minutes of underwater adventure, letting you diver deeper than you could with your first couple SCUBA certifications, and still having time to look around and explore the undersea world.
That is Freediving…
Freediving is the practice of using this untapped ability of your own body to become Aquaman (or Aquawoman) and experience the world aquatic in a whole new way. No air tanks. No extra machines. Just you and the ocean.
Simple as that.
Freediving is simply relaxing, and letting your body’s primal response to water happen naturally, controlling how you react in the water, and taking a few extra precautionary steps along the way for safety.
With a simple process, it’s not uncommon for new freedivers to swim down to (and hang out at) 30 meters (~90 feet) underwater with just a pair of fins and a mask. No cumbersome gear. No decompression times. No extra costs.
Whether you’re spearfishing, snorkeling, or just playing in the water, that ability to hang out in the deep blue always feels empowering and amazing. Plus, with how minimalist and free the act of freediving is, it’s the perfect hobby and skill for minimalist travelers to take with them to tropical destinations to ensure they’re always ready to turn any snorkel excursion into a unique adventure.
The aim of this freediving manual is to start on your way to achieving these seemingly miraculous but very natural feats, quickly, easily, and safely.
HOW DOES FREEDIVING WORK?
How can a person hold their breath for 3-4 minutes and reach 25 meters depth?
Breath-holding, and the pre-breathing and recovery breathing elements are arguably the most important aspects of freediving – outside of safety precautions, of course. Proper free diving breath-holding is essentially relaxing your body to allow it to use the oxygen in your lungs and blood more efficiently while you consciously manage your response to your body’s “urge to breath” via the following steps:
1. Taking 3 to 5 minutes pre-breath-hold to consciously relax and practice deep breathing techniques to relax your body further and reduce how much oxygen your body uses at rest. Achieving this relaxed yet alert state makes every breath last longer, quickly extending how long you are able to hold each breath. (Click here to read more on the pre-dive breathing techniques here)
2. (In the water) Letting a natural process in your body called the “mammalian dive reflex” occur as your body reacts to water. This response adapts your body’s processes, like heart rate, blood flow, and red blood cell management, to help you survive in the water and increase how efficiently your body uses oxygen.
(Click here to read more on the mammalian dive reflex)
3. Understanding and expecting the physiological responses of your body’s “urge to breath” reacts to the rise of CO2 levels in your body and the decreasing oxygen levels in your body. Then, managing your conscious response to the “urge to breath” expressed as a burning sensation in your lungs, and the growing spasms in your chest and lungs. Becoming familiar with the intensity of your own body’s response allows you to better understand how much oxygen remains in your blood and lungs, and how much longer you can safely hold your breath. (Click here to read more on the “urge to breathe”)
4. Using proper finning technique and “duck diving” to move through the water and dive with as little effort (and oxygen) expended as possible. (Click here jump to the section on duck diving)
5. Performing recovery breathing immediately on return to the surface and after breath-holding to re-oxygenate the body and avoid blacking out (Jump to recovery breathing)
Note: This process should always happen with the assistance of a qualified buddy and several safety precautions that we’ll delve into later. (Jump to essential freediving safety precautions)
But why would you even need to freedive? Why wouldn’t snorkeling or SCUBA diving be enough?
Simply put, to adventure and explore more and more freely.
HOW FREEDIVING CAN ENHANCE HOW YOU EXPLORE AND TRAVEL
Freediving as a whole, including breath-holding techniques, proper finning and duck diving, and the essential safety techniques, allow us to unlock our body’s natural power of surviving in the water and ultimately dive to 30 meters / 90 feet or more on a single breath. No machines. No complicated tools. Just us and nature, making freediving a staple part of my Adventure 8, eight adventure sports that help me travel better by engaging with nature and the most beautiful places on the planet in a more simple way.
These skills, of conscious relaxation, breath-holding, and efficient movement, unlock a whole world of underwater adventure in a way no other adventure sport can.
Though SCUBA diving gets a lot of attention, an entry-level SCUBA diver can only go to a depth of 18 meters at a time after their first PADI or SSI certification. On the other hand, most freedivers reach depths of 20+ meters within their first couple of days of training and 25 meters (75 feet) shortly after that.
Beyond the freediving vs. SCUBA diving comparison, freediving in its own right allows you to reach sufficient depths to explore some of the best dive sites on the planet just fine – the Red off the coast of Egypt and Jordan, great dive sites in Indonesia, World War 2 wrecks and coral forests in the Philippines, and countless sites in Central America. All of these dive sites lie within 10 meters of the surface, making for an easy dive and plenty of time to explore and enjoy on the bottom.
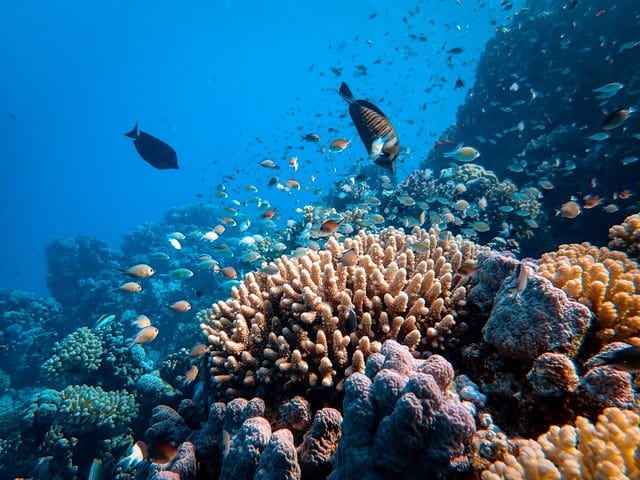
For travelers, this freedom – the freedom to turn any snorkel tour into an aquatic adventure – opens a whole new world of adventure and destinations, all without the cumbersome SCUBA apparatuses, procedures, and costs. While all of the other snorkelers are floating on the surface, you can grab a mask and fins and explore the depths on your own – freely and cheaply.
My Experience Freediving in the Philippines: My Selling Point for Choosing Freediving over SCUBA Diving
During my trip, the Philippines, shortly after my freediving course, I experienced the travel enhancing benefits of freediving skills firsthand. The small island of Coron in the Philippines is surrounded by more than 10 Japanese shipwrecks from World War 2, and more than five are at depths of less than 15 meters.
These sunken warships are popular stops for “island-hopping” and snorkeling day trips, and I took full advantage of the convenient opportunity. While most of the passengers on my boat floated on the surface of the water clad in life jackets, just observing the ship from above, I kicked down to the sunken warship’s deck and sat on its surface, then kicked along the length of the ghostly ship’s hull.
Because few of the snorkeling tourists could swim more than a few feet below the surface, another freediver and I felt like we had the shipwreck all to ourselves – and a handful of SCUBA divers that passed through. Even more, we had the same experience at three other ships that same day, along with a protected coral forest at 7 meters depth. We both swam down and just floated between the colorful coral and fishes at will.
The experience of “diving” through the Philippines with such freedom was fantastic, one I highly recommend, and one of the hundreds around the globe that open to you once you learn to free dive.
Even more benefits of freediving over SCUBA diving:
- There is little planning required (just jump in
and follow your gut) - No decompression time (you can come up whenever
you want, as quickly as you want) - No potential issues with “the bends” (nitrogen
bubbles in the bloodstream) - No issues with flying too soon that you
generally have with SCUBA diving.
Freediving is an all-around cheap, simple, and flexible option for experiencing and exploring the ocean. You can do it on a whim…or not
And if you were to plan a world tour based on freediving sites, you’d naturally have planned a tour of some of the most beautiful places around the world – above and below the surface.
An interesting and beautiful video about how freediving plays into her lifestyle on Hawaii as a native, and her encounter with a great white shark
15 THINGS YOU NEED TO KNOW ABOUT FREEDIVING TO GET STARTED
The quick, bulleted free diving overview to follow is written for people like me – excited for their first freediving experience, excited to get ready, and open to experimenting (safely) on their own before jumping into a structured freediving course.
When wandering the globe, I prefer to teach myself and engage in independent experiences for the adventurous experience as well as personal growth. However, some adventures eventually require professional instruction to stay safe and learn the techniques that you will need to push your skills safely. Freediving is absolutely the kind of experience you can dabble in but should take a course to be safe and find your limits.
For such courses, I always get more from the experience if I come in with at least a vague idea of the concepts and processes to be covered, to build on and learn about through my teacher. To help you out, in not only dabbling beforehand but preparing for your own freediving course at a later date, I think everyone starting out in freediving should be familiar with these essential ideas and concepts.
Here are the 15 concepts I recommend being familiar with before Freediving, and some great resources to point you on the way to preparation:
- You should never freedive alone, and only freedive with an experienced diver trained in rescue breathing (Click here to jump to the safety precautions you should know about before freediving)
- Always practice your breath-holding on dry land well before getting in the water. (Click here to jump to a practical breath holding exercise that’ll get you to a 3 minute breath hold easily)
- Never hold your breath underwater alone
- Learn the Frenzel equalization method before starting a freediving course. This equalization technique is essential to efficient freediving below 10 meters. Check to see if you can do the “Frenzel Technique” before even signing up for a course. If you can’t use youtube videos and practice until you get it first.
- Avoid hyperventilation before and after diving, as the practice exponentially increases the risk of blackouts in general, especially shallow water blackouts
- Understand that shallow water blackouts are your biggest risk in freediving and are extremely dangerous, and mitigate accordingly
- Practice proper recovery breathing to safely reoxygenate the body immediately after every breath-hold and free dive
- Understand the “urge to breathe,” and burning sensation in your lungs is actually caused by CO2 accumulation, not a lack of oxygen. Get familiar with this concept and feeling to max out your breath-hold and stay safe.
- Realize that whenever you feel that intense urge to breathe, you still have about 60% of your oxygen left in your body
- Get motivated by the fact that you’ll likely be able to hold your breath for more than 3 minutes during the first session, and possible with the freediving breathing techniques practical exercise at the end of this guide
- Get even more motivated by the fact that you’ll likely swim to 65 ft (20 meters) on your second day in the water
- 90% of spearfishing is freediving – so by learning freediving, you’re building up some great skills to grow on
- Some of the cheapest places to learn freediving are Egypt (Dhahab), Thailand (Koh Tao), and Bali, Indonesia, which are also cheap and amazing adventure travel destinations, so know that freediving makes “budget adventure travel” even more of a possibility
- All mammals naturally have a reflex to water that slows the heart rate and extends the ability to hold breath and survive underwater, so know that your body has potential freediving will unlock via the mammalian dive reflex
- Understand that there are immense risks in freediving: 1 in every 500 recreational freedivers die each year. Understanding the risks and essential safety measures necessary to mitigate these risks should be your first concern in freediving.
THE PURPOSE OF THIS FREEDIVING MANUAL
- To convince you to take up
freediving to enhance your travels - To help you increase your “static
breath-hold” (breath-hold on dry land) to 2 minutes, likely 3 minutes, and ideally
4 minutes (with practice) before you begin free diving and a freediving course - To start familiarizing you with the
risks of freediving and the techniques that will help you freedive and snorkel
more safely - To convince you to take a proper
freediving course to explore the ocean safely and beyond any limits, you
thought existed
Not too long ago, a friend and I started Freediving on Bali with great results by taking a course. Though the course was sufficient, we both would have gained much more from the course (and pushed our limits further) if we had a simple freediving manual or beginner’s guide to get familiar with the basic concepts of freediving before starting the course. We would have been able to ask more questions of the instructor and push our limits further in the water under the supervision of an instructor. Even better, we would have been able to train in breath-holding (“static breath holding”) on dry land well in advance of the course.
This guide is meant to familiarize potential freedivers with the essential concepts and techniques of breath-holding, freediving, and freediving safety and point them to other great resources on the internet for each concept, to continue prepping for a certified freediving course – and train in breath-holding on dry land in the meantime.
For those unable to attend a freediving course at this time, this guide will direct you through resources and tutorials on the essential concepts so that you can safely train to hold your breath longer (on dry land) and start familiarizing yourself with the safety practices and techniques eventually required in freediving. Though you can train static breath-holding (holding your breath on dry land), as well as duckdiving, kicking, and several other techniques without paying for a course, I highly recommend you find a coach, instructor, club or experienced partner before training breath holding in the water and absolutely do not train underwater breath-holding alone as this is possibly the riskiest part of freediving.
For the record – this guide has everything I wish I knew before my freediving course, but I DO NOT recommend freediving until completing an SSI or PADI freediving course as it is a high-risk sport (1 in 500 recreational freedivers die annually). This guide alone is not enough to push your freediving limits – but it is enough to prep for a course. Please use it accordingly and do not freedive without proper instruction and certification.
IMPORTANT SAFETY NOTES ON FREEDIVING
- 1 in 500 recreational freedivers die making it
the second most dangerous adventure sport - Never train breath holding in the water alone
- Never free dive without a partner trained in
rescue breathing and familiar with proper spotting during freediving - Be sure to train in a pool before training in
the ocean - Shallow
water blackouts are the biggest risk in freediving and are very dangerous - Hyperventilating is associated with half of all
freediving accidents, so never do it - Never dive with a snorkel in your mouth.
1. 1 in 500 recreational freedivers die and is the second most dangerous adventure sport
As reported by Divers Alert Network, roughly 1 in every 500 recreational free divers dies every year, making free diving the second most dangerous sport behind base jumping.
In contrast, competition freediving only experiences roughly one death in every 50,000 competition freedivers annually.
Blackouts and subsequent drowning make up the majority of death cases in both recreational and competition freediving.
These two statistics, the situations reported around the deaths, and the safety and process differences behind recreational freediving and competition freediving imply that inadequate safety processes are the primary reason for the difference between the rate of deaths in recreational freediving compared to competition freediving.
The lesson to take from these statistics is to never dive without robust safety processes and properly trained dive buddies adhering to safety best practices, proper spotting, and constantly ready to save the day. Ensure you’re both equipped to react, rescue, and resuscitate if something goes wrong, and you (or they) do blackout or become incapacitated. If you’re not capable of doing this, don’t dive. Period.
2. Never train breath holding in the water alone
Shallow water blackouts, generally at depths of less than 10 meters, are the most common incidents and cause of death in freediving. Though a blackout may not be fatal if the victim is brought to the surface, has their airway cleared, and is resuscitated, brain damage is still nearly guaranteed within minutes if proper recovery doesn’t happen.
Reduce your risk by ensuring that someone is always on standby to breath-holding work in the water, checking every 15-30 seconds that you are still conscious and holding your breath (vice blacked out) through breath-holding training. During a dive, ensure your buddy has eyes on you and is observing you well enough to determine if you are still conscious and functioning at all times.
Never, ever, ever, dive alone or practice breath-holding in the water (pool, bathtub, ocean, or anywhere) alone.
3. Never free dive without a partner trained in rescue breathing and familiar with proper spotting during freediving
Having a buddy around that has your back isn’t enough. They need to be capable of performing the essential lifesaving procedures.
Think worst-case scenario and determine, given the location and situation, if you do blackout, will your partner be able to recover you, clear your airway, and resuscitate you within a few minutes? If the answer is no, don’t go out.
Keep in mind that this rescue requires the strength to move you, and the knowledge of proper resuscitation procedures within minutes to avoid brain damage. If you’re freediving in the open ocean with a buoy or flotation device, this rescue would need to happen on the buoy or flotation device. If you’re diving off a boat, they would need to be able to swim you quickly over to a boat, then have the skill to resuscitate.
Do you trust your partner to do this?
Consider these answers heavily before pushing your limits or diving with that buddy.
4. Be sure to train in a pool before training in the ocean
Freediving, and training to freedive, in the open ocean, presents a completely different set of risks than the contained environment of swimming pools. From spotting in low visibility water to rescuing and resuscitating without a solid surface in the event of an accident, things get stickier in open water. Though exploring the big blue is our end aim, reduce your risks by learning in the controlled confines of a pool before adding the x-factors of freediving in the open ocean.
5. Shallow water blackouts are the biggest risk in freediving
Blackouts are the biggest risk in freediving as the worst-case scenarios commonly follow after a blackout. Additionally, blacking out is more of a possibility than some give it credit for and can be exacerbated by bad free diving practices such as hyperventilating, going too deep, and not practicing good recovery breaths.
Yes, having a competent dive buddy around to bring you back after a blackout can be a lifesaver, but not getting into the situation (by not blacking out) is the preferred primary option.
What does this mean for you?
Before free diving and holding your breath underwater, ensure you understand blackouts, what leads to them, and the practices/situations to absolutely avoid to prevent blacking out
6. Hyperventilating is associated with half of all freediving accidents and should be avoided at all costs.
In half of the freediving blackouts in which the victim recovered, the victims were reported to have practiced hyperventilating before their freedive.
The act of hyperventilating purges the body of carbon dioxide. This action artificially lowers carbon dioxide levels in the blood, essentially delaying the “urge to breath” without delaying blackout. The end result is that hyperventilating eliminates the “urge to breathe” without eliminating your body’s blackout response leaving you unable to judge how much longer you can safely hold your breath.
Essentially, hyperventilation makes you feel like you don’t need to breathe, but your brain will still force a blackout in an attempt to get you to start breathing again. This attempt to get you to breathe (the blackout) will happen after holding your breath too long, whether you’re on dry land or 10 meters down.
The point?
Breath normally before a dive so that your oxygen and carbon dioxide content in your blood remains normal and predictable, allowing your natural processes (the urge to breathe, blackouts) to occur at appropriate, manageable times.
Ultimately, never hyperventilate before free diving.
7. Never dive with a snorkel in your mouth
Our bodies are genius pieces of equipment with an evolutionary adaptation to almost everything, including blacking out underwater.
This is the reflex that could save your life if you blackout underwater.
Essentially, if you pass out in the water, your body responds with a reflex (the Laryngospam spasm) that automatically closes the throat, not allowing water to enter the throat or lungs if you ever go unconscious underwater, as a response to moisture entering the lungs
However, if you dive with a snorkel in your mouth and blackout, the snorkel’s placement in your mouth prevents the Laryngospam spasm reflex and funnels water straight into your mouth and into your lungs, nearly guaranteeing drowning.
Avoid bypassing the laryngospasm safety reflex by always removing your snorkel before every dive.
UNDERSTANDING BLACKOUTS IN FREEDIVING: ESSENTIALS YOU NEED TO KNOW
Blackouts in freediving are the biggest risk.
Blackouts are your brain and body’s safety mechanism to take away conscious control of your body and force breathing when oxygen levels in the blood fall below a specific level.
In normal, healthy individuals, the “urge to breathe” will be triggered by rising carbon dioxide levels in the blood well before a blackout occurs – also triggering a burning sensation in the lungs and progressively stronger spasms. For this reason, we need to become acutely familiar with our own urge to breathe and how closely it occurs to blackout.
Another scenario in which blackouts are at a high risk of occurrence is immediately after a breath-hold when blood oxygen levels are low, and we are prone to exhale. Exhaling too much air (emptying the lungs too much) can trigger a “panic mode” within the brain, ultimately triggering a blackout. To prevent blackouts post-dive, practice proper recovery breathing, short, quick sips of breath and exhalation to reoxygenate the blood without emptying the lungs (read more on that below).
Additionally, dive buddies should monitor divers for at least 30 seconds after a dive to ensure they don’t blackout during recovery breathing and perform proper recovery breathing.
Lastly, do not dive for at least 4 minutes after a dive or breath-hold to allow blood oxygen levels and body processes to return to normal.
THE FREEDIVING PROCESS: HOW FREEDIVING WORKS
- Breath-holding
preparation, breathing, and breath-holding before diving - Recovery
Breathing - A Practical Exercise in
Freediving Breathing Techniques - Equalization:
The Frenzel and Valsalva Methods - Duck diving
THE ESSENTIALS OF BREATH HOLDING IN FREEDIVING
Freediving is built on a handful of simple, interesting, and useful concepts that all work together to relax the body, increase how efficiently oxygen is used, increase how long you can hold your breath, and ensure you do it all safely. Understanding these concepts will easily enhance how well you’re your breath, freedive, and push your limits safely. Most of these concepts are all around proper breathing, pre-dive and post-dive, and the act of breath-holding.
The essential freediving breathing techniques and breath-holding techniques we’ll review are:
- The Mammalian
Dive Reflex - Conscious relaxation
of the body - Breathing
Techniques and Preparation for breath holds - Proper recovery breathing
after breath holds, to avoid blackouts
UNDERSTANDING THE MAMMALIAN DIVE REFLEX
A NATURAL, AQUATIC REFLEX TO BE AWARE OF
The Mammalian Dive Reflex is a physiological response that mammals have when exposed to water. The response works in their favor, extend how long mammals can stay safely underwater, by temporarily changing how their respiratory and cardiovascular systems (breathing and blood) function, ultimately allowing them to stay underwater longer.
This physiological response, the mammalian dive reflex, is triggered by exposing the face and nostrils to cold water. This exposure and response slow the heart rate, raise the blood pressure, and cause the body to use oxygen more efficiently and sparingly. These reactions give mammals, dolphins, whales, sea lions, and even humans, the ability to stay underwater for much longer than they otherwise could on dry land.
The three main responses of slowed heart rate, restricted blood flow (isolated to the vital organs), and release of more red blood cells from the spleen, allow mammals to use the oxygen stored in the body (in the lungs and the blood) more sparingly and efficiently, allowing them to survive longer on a single breath.
Exposing the face and nostrils to water, especially chilled water, elicits this response gradually, increasing with longer exposure, and is enhanced with relaxation and complementary breathing techniques.
Click here to read more on the mammalian dive reflex
How to use the Mammalian Dive Reflex when freediving: Essentially, just relax. Knowing that the mammalian dive reflex will take place should give you the confidence and knowledge that your body is capable of more in the water than you might have thought – and ultimately help you relax. Also, understand that the reflex is slow and gradual, so the longer the amount of time you spend in the water during a period, the more the reflex will kick in, so relax and be patient.
CONSCIOUS RELAXATION OF THE BODY
By consciously relaxing as many parts of the body as possible and releasing the tension in the period prior to breath-holding or diving, we further reduce the amount of oxygen that the body is using. This allows the oxygen stored in the blood and lungs to last longer, enabling a longer breath-hold.
How to use conscious relaxation for freediving: Before the pre-breathing, and before your dive, perform a conscious body scan searching for tightness and tension in the muscles of your body. At each point of your body that you feel tension, keep your attention on it, and consciously relax, breathing deeply while you do so. Also, during your pre-breathing, after you’ve attempted to relax as much as possible, try to let your body remain loose and relaxed up until the moment before your dive.
PRE-FREE DIVING BREATHING TECHNIQUES
By performing a couple of breathing techniques before the dive, we can 1) further relax the body, making for more efficient use of our body’s oxygen and 2) increase the amount of oxygen stored in the blood and lungs – ultimately making for the longest possible breath-hold. I highly recommend trying this technique out on dry land using the practical breathing exercise. Note that we are simply breathing naturally and deeply, not hyperventilating.
The pre-freedive breathing techniques can be summed up in 2 parts
First, perform 2-3 minutes of relaxed, natural “chest breathing” wherein the chest rises and falls without much movement in the abdomen. This chest breathing serves the purpose of relaxing the body, releasing the tension, lowering the heart rate, and oxygenating the blood and body. Just breathe naturally, into the chest (not the stomach or diaphragm) in a relaxed position, possibly laying down with your eyes closed. After the 2-3 minutes of chest breathing, and when you feel comfortable, proceed on to step two.
Second, take 4 to 6 deep, diaphragmatic breaths (or “belly breaths”) aiming to breathe as deeply as possible and progressively fill your lungs with as much air as possible. This step serves to fill our lungs with as much air as possible, providing us more oxygen for the breath-hold. On the final breath, breathe deeply and hold to start the breath-hold.
While deep breathing is part of proper preparation for apnea (breath holding), you should absolutely avoid hyperventilating at any cost as this increases your risk of shallow water blackout. Most survivors of shallow water blackouts report using hyperventilation techniques prior to the dive they blacked out on. Hyperventilating artificially lowers carbon dioxide levels, which is bad because it suppresses your body’s “urge to breathe” and causes your body to miscalculate conditions, causing you to blackout before you feel the sensation and urge to breathe. Read more on avoiding hyperventilation in this safety section
Now, try the practical breathing exercise that follows to test your limits.
An excellent explanation of freediving breathing techniques and the physiology behind it
THE URGE TO BREATHE, MANAGING IT, AND USING IT TO HOLD YOUR BREATH LONGER
The “urge to breathe” is an essential safety mechanism within your body for breath-holding and freediving.
Whenever you hold your breath for an extended period (longer than you’re used to), you’re bound to feel this “urge to breathe” – a burning sensation in the lungs followed accompanied by uncontrolled spasms in the lungs attempting to force exhalation. Breathing is natural and required for survival, so it makes sense that your body has a response encouraging you to keep breathing as you normally would—this urge to breathe kicks in when carbon dioxide levels in the blood reach a certain point.
However, when it comes to maximizing your breath-holding abilities, you’ll need to understand the feeling of that “urge to breath,” what’s happening in your body to understand how to respond to it, to control your reaction to the feeling, and to know when you genuinely need to get to the surface to breath. This will ultimately keep you safe – by letting you know when you absolutely need to get air before blacking out – and help you dive longer, by understanding how long you can safely resist the urge to breathe.
By the time the first “contraction” occurs due to the urge to breathe, most people exhale because they feel they absolutely need to breathe, but the body actually still has about 60% of its oxygen left in the blood, which is plenty to keep going…at least a little longer. Take note that the urge to breathe is caused by a buildup of Carbon Dioxide in the blood, and is not caused by a lack of oxygen – this is an essential reason why you should absolutely do not hyperventilate before holding your breath as it artificially purges the blood of carbon dioxide and suppresses the urge to breathe, encouraging blackout.
For most people, it is possible to safely resist two to three contractions/spasms triggered by the urge to breath, before getting to air ASAP, but this will differ from person to person. For some people, they may be able to safely withstand more contractions, and for some people, fewer contractions. There is a small percentage of the population that actually has no contractions or urge to breathe triggered – meaning they will blackout before they feel the urge to breathe, which is one more reason it is essential to push your limits of breath-holding on dry land and to understand your body’s response to breath-holding, well before getting in the water.
How to use the urge to breathe in freediving
Understand what the urge to breathe feels like (burning sensation in the lungs and chest spasms) and how many “contractions” you can safely endure before you truly need to breathe. Use this urge to breathe as your metric for a safe dive, not pushing the limit too far. Absolutely work to understand your own urge to breathe and breath-holding abilities and limitations before getting in the water and never practice breath-holding in the water alone or without proper spotting.
EXPLORING YOUR BREATH HOLD AND YOUR “URGE TO BREATHE”
The “urge to breathe” is an essential set of physiological responses to understand the limits of your breath hold, to understand your potential, and to stay safe along the way.
To explore the uniqueness of your urge to breathe, I encourage you to take the following steps:
- Do the practical exercise in breath-holding
to follow 3 to 5 times, aiming for the longest breath-hold possible, but
experiencing and observing the “urge to breathe” physiological responses –
specifically the burning sensation in the chest and the spasming in your chest,
counting the spasms as they occur - Do the practical breathing exercise 3 to 5 more
times, aiming to “one-up” the number of chest spasms you make it through during
each breath hold – I recommend laying down for this just in case you do blackout. If you blackout, no worries (as long as
you’re lying down and have nowhere to fall).
You’ll regain consciousness within minutes. - Continue holding your breath to understand where
your breath holding limits are and how strong, unique the burning sensation and
spasms feel as you get closer to your limit (wherein blackout will occur).
Continue training the breath-hold, and as you max out by simply understanding breath-holding, I recommend researching “CO2 tables” as a training method for increasing your breath-hold further.
RECOVERY BREATHING: HOW TO NOT PASS OUT AFTER HOLDING YOUR BREATH
After any breath-holding or freedive, the first thing you should do is recovery breathing. Recovery breathing aims to safely and quickly re-oxygenate your body before blackout sets in.
During a freedive or breath-hold, oxygen levels in the body drop while carbon dioxide levels rise, pushing the body to its limits as oxygen levels drop, the risk of blackout increases. If at the end of the breath-hold a diver completely exhales, emptying the lungs, there is a high possibility that the already low oxygen conditions combined with empty lungs due to exhalation can trigger a shallow water blackout. So, at all costs, do not fully exhale after a dive. Instead, release and inhale small “sips of air” quickly to reoxygenate the body via recovery breathing without emptying the lungs.
Recovery breathing allows us to help our body return to a normally oxygenated state (reducing the risk of blackout) while avoiding emptying our lungs as we would be taking a big, deep breath. Recovery breathing thus drastically reduces the risk of blackouts in shallow water.
To perform recovery breathing, exhale a small sip of air and then quickly breath into full lungs again, and repeat several times (at least six times). At no point should your lungs be anywhere near empty. Please watch the video below to see a proper demonstration.
Once you’ve completed a dive or breath-hold, do not dive again for at least 4 minutes.
How to use recovery breathing in freediving: After EVERY breath-hold or dive, practice proper recovery breathing whether or not you feel the need. Build the habit and force your partner to practice recovery, breathing immediately on resurfacing as well.
A PRACTICAL EXERCISE IN FREEDIVING BREATHING TECHNIQUES AND BREATH-HOLDING
Breath-holding and the ability to extend one’s time under water is the majority of freediving, but this activity needs to be explored on dry land extensively before trying the techniques and breath-holding in the water.
The following is a practical exercise in pre-breathing and static “breath-holding” (breath-holding on dry land).
Before starting this exercise, simply hold your breath once. Don’t practice a pre-breathing or anything you’ve learned in this guide – just time yourself, hold your breath, and record the time. Ensure you’re ideally laying down or seated, so that you are as relaxed as possible and avoid any problems if you blackout or come out of the breath-hold a little light-headed. Don’t look at the watch during your breath-hold. Now, record this time as a baseline to see how the breathing and breath-holding techniques that follow help you improve.
Now, relax for 4 minutes, then proceed with a proper pre-breath hold breathing exercise, as detailed below. Before the final breath, start your timer and start your static breath-hold (on dry land). Don’t look at your watch during the breath-hold, but record your time in the end.
Perform your Apnea preparation breathing, and try to hold your breath as long as possible after your last deep breath. (Read here for a full review of pre-breathing or continue on to the steps)
- Perform 2 to 3 minutes of relaxed, normal “chest
breathing” while laying down in a relaxed position - Perform 4 to 6 deep, diaphragmatic
“belly breaths” - Hold the final deep, belly breath, breathing in
as deeply as possible. - Aim to hold your breath for at least 10
seconds after you feel the first “contraction” in your lungs
due to the urge to breathe. If you
can go further, try. - When you come out of the breath-hold immediately
begin recovery breathing - Record your time and the number of chest
contractions you made it through.
Now that you’ve completed a “proper” static breath-hold record your time. How did it compare to your initial time? How many “contractions” did you feel during your “urge to breathe”? Note all of this.
Let’s continue. Rest for 4 minutes, then proceed with another round of pre-breathing – 2 to 3 minutes of chest breath followed by 4-6 deep “belly breaths” and a final deep breath for the breath-hold. In this breath-hold, aim to go a little longer, focusing on lasting through more “contractions” during your urge to breathe.
Try to achieve two more contractions beyond your last breath-hold.
Ensure you’re sitting or lying in a relaxed, safe position in the event that you blackout. And go…
Perform your recovery breaths immediately upon coming out.
Record your time and the number of contractions you lasted through
Now, how did the numbers compare between those three rounds? How long was your progressive breath holds? How many contractions did you comfortably make it through? Exploring all of this, your times, the sensations, and how you feel coming out of the breath-hold (“fine,” “borderline blackout,” “borderline grey out”) is exactly what you need to do on dry land to understand your limits and push them safely while building the safety essentials such as understanding your own urge to breath and practicing proper recovery breathing.
Now, perform the entire process one more time.
How have your results improved?
By doing this extremely simple exercise a couple of times a week, I was able to achieve a 4 minute static (on dry land) breath-hold. But ask any experienced freediver, and they’ll tell you that a static breath hold record is great, but it’s all about being in the water, so let’s get on to the water techniques.
Interested in learning more about how to hold your breath? Check out this great guide https://freediveuk.com/how-to-hold-your-breath-for-5-minutes-in-1month-freediving-training/
EQUALIZATION
As you explore and dive deeper, one of the biggest things to cope with will be pressure – not just the stress and pressure of the situation, but the literal water pressure that increases with every meter of diving. The pressure within your head naturally adapts to air pressure above water – but to stay safe and comfortable, we need to be able to balance the pressure of the water (outside our heads and goggles) with the pressure inside our heads and goggles, manually. This practice of balancing the external and internal pressure our bodies are experiencing is called equalization.
But, is the water pressure that significant that we must equalize?
Absolutely
For every 10 meters down you dive, the weight of the water increases by 1x of what it would be on land – about 14lbs per square inch (also known as 1 “BAR” or atmospheric unit (ATM)).
To put this simply, on the surface at dry land, your body experiences ~14 lbs per square inch. At 10 meters depth (~30 feet), your body experiences ~28lbs per square inch. At 20 meters depth (~60 feet), your body experiences ~42lbs per square inch. Lastly, at 30 meters depth (~90 feet), your body experiences roughly 56lbs of pressure on every square inch of your body.
That difference, between 14lbs per inch at the surface, and 56lbs per inch at depth is fairly significant and makes equalization an essential skill.
Though your body (arms and legs) may handle that kind of pressure easily, the delicate system within your head requires “tuning” via equalization continuously on descent and ascent.
Throughout your head are tubes filled with air, called Eustachian Tubes. These tubes of air ensure that the pressure outside of your head is equaled by the pressure inside of your head. Put simply; this pressure balance keeps everything functioning well. On land, this balance of pressure stays perfect effortlessly. Think about whenever you have flown in an airplane. Do you remember feeling slight pressure in your head and then finally feeling a “pop” somewhere between your ears? That pop and feeling of relief came from your Eustachian Tubes, letting air out to balance the lower air pressure in the plane compared to the air pressure you previously experienced on the ground. We’ll need to trigger the same balancing act to happen at will in the water.
There are two methods of “equalizing” the air pressure inside our heads to the air/water pressure from outside: the Frenzel method and the Valsalva method.
THE FRENZEL EQUALIZATION METHOD
The Frenzel Equalization Method is the preferred method for equalizing during freediving as it can be done upside down, allowing for a more efficient dive.
The Frenzel Equalization Method is accomplished by closing the throat via the glottis, pinching the nose, and flexing the muscles of the tongue, throat, and jaw to force air upward and into the Eustachian tubes, equalizing the pressure inside of the head with the water pressure outside of the head.
Yeah, that complicated definition makes the Frenzel Method very difficult to understand and visualize, so I’ve added the videos below from some pros to explain the method.
Keep in mind that if you cannot do the Frenzel Equalization method, you will have difficulty diving below 5-10 meters, and you will not be able to PADI Freedive certify, so test out your ability to do this before signing up for a course.
Educating you on how to do the Frenzel method just by writing is nearly impossible in a short guide like this, but the video below does a great job of introducing the Frenzel method and starting the journey to learning it. I highly recommend learning the Frenzel Method before starting a freediving course, as it is essential to reach depths beyond 10 meters (30 feet).
…and here’s one more video on Frenzel Equalization for good measure
VALSALVA EQUALIZATION METHOD
The Valsalva method is an equalization method that uses the lungs (and muscles surrounding them) to force air into the head, instead of the throat and tongue as with the Frenzel method. Though this method is much more common in daily life (like on airplane rides), it is much less effective in freediving compared to the Frenzel method.
Though the Valsalva Equalization Method is the approach most people are familiar with, it is inferior to the Frenzel method because it usually can only be done upright, making for an inefficient dive. Also, if a person is only able to Valsalva Equalize, duckdiving becomes risky as the diver may descend faster than they can equalize, risking a ruptured eardrum or worse. BUT the Valsalva method is a good first step to understanding equalization.
The Valsalva Equalization Method is accomplished by pinching the nose, closing the mouth, and squeezing the lungs to force air upward into the head and the Eustachian tubes. When you hear and feel the pop, you’ve equalized.
Because the lungs are used to force the air into the head, a fair distance away, when underwater and upside down the Valsalva method, is extremely difficult as it requires much lung strength to force the buoyant air down while underwater and it becomes more difficult the deeper you go.
I recommend watching the video below to better understand the Valsalva equalization method
DUCK DIVING
After we’ve achieved the ability to hold our breath and understand the essential safety practices in freediving, it is time to start freediving actually. Efficient movement, and consequently using as little oxygen as possible, is a tenant of freediving. To efficiently get from the water’s surface to depth without kicking frantically the duck dive is the technique of choice.
The duck dive is an efficient approach to quickly get momentum and keep it as you dive underwater, upside down and vertical, while expending as little energy as possible.
The duck dive is accomplished by kicking horizontally on the surface of the water to gain momentum, then bending at the waist to point the arms, head, and torso down. One leg should come out of the water and vertically overhead, shifting the weight out of the water, overhead, and reducing buoyancy briefly, and also creating vertical downward pressure and pushing the body underwater as the second leg comes vertically to meet it. Once the body is submerged, begin relaxed kicking with straight legs.
Watch the video below for a better tutorial on how to duck dive.
.

.
ABOUT THE AUTHOR
Carlos Grider launched A Brother Abroad in 2017 after a “one-year abroad” experiment turned into a long-term life strategy. After 65+ countries and a decade abroad, he now writes about FIRE, personal finance, geo-arbitrage, and the real-world logistics of living abroad—visas, costs, and tradeoffs—so readers can make smarter global moves with fewer surprises. Carlos is a former Big 4 management consultant and DoD cultural advisor with an MBA (UT Austin) and Boston University’s Certificate in Financial Planning. He’s the author of Digital Nomad Nation: Rise of the Borderless Generation and is currently writing The Sovereign Expat.