
Torres del Paine is one of the highlights of Patagonia and the most trafficked national parks in South America for good reason. I’ve visited twice – once for the Torres del Paine W trek and a second time for the circuit trek – and loved both experiences immensely. If you need an adventure, the unmatched beauty, surreal views, and irreplaceable calm of the outdoors in Torres del Paine are what you’ve been waiting for…
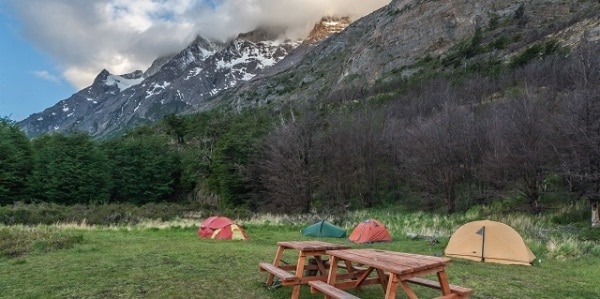
So why travel to the end of the world for a 5 day hike? Insanely beautiful and pristine views, vast towering landscapes that are quintessentially Patagonia, a great trail network, and a peacefulness you won’t find elsewhere. Not convinced yet? Here are 7 great reasons to take on the treks of Torres del Paine
7 Reasons to do the Torres del Paine W Trek
- Torres del Paine was named 5th most beautiful park in the world by Nat Geo
- Named 8th wonder of the world by Trip Advisor
- Fits perfectly into a South America backpacking trip cheaply with easy transportation (Argentina or Brazil anyone??)
- Quintessential Patagonia with glaciers, spires, crystal blue waters, and unique wildlife
- Easy for novices (trails, accessible gear rental, instruction) but fulfilling for avid trekkers (ideally on the circuit)
- Near other epic outdoor experiences in South America – Perito Moreno Glacier, El Chalten, and even Bariloche and the lake district
In the guide to follow, you’ll find everything you need to know to make the Torres del Paine W trek independently and cheaply. Itinerary, transportation info, budget and costs, packing lists, where to purchase and rent equipment, and even more tips to keep the trek fun, comfortable, and cheap — all right here.
A Note on the images in this article: This guide has some amazing imagery, courtesy of other travelers, willing to share their adventures with you (and me). Feel free to support them by following the photo credit link to discover their other adventures…
(Note: This article contains affiliate links that pay for the cost of writing and publishing at nocost to you)

Table of Contents
- Torres del Paine W Trek Quick Facts
- Quick Costs of Torres del Paine W Trek
- Major Highlights of the Torres del Paine W Trek
- Torres del Paine W Trek Itinerary Overview
- —-Full Torres del Paine W Trek Guide—-
- Torres del Paine W Trek Itinerary (Full)
- Full Torres del Paine W Trek Costs
- Park Fees and Transportation Fees
- Individual Campsite Costs:
- Individual Refugio Costs
- Average Gear Rental Costs (when rented from Puerto Natales)
- Meal Costs (in Park, served at refugios)
- Torres del Paine Trek Preparation Checklist
- Gear and Essentials for the Torres del Paine W Trek
- Renting and Buying Gear
- Torres del Paine Packing list
- How to layer and wear your clothes on the trek
- Food and water on the trek
- Getting to Torres del Paine
- Safety in the Park
- Frequently Asked Questions on the Torres del Paine W Trek
Overview of the Torres del Paine W Trek
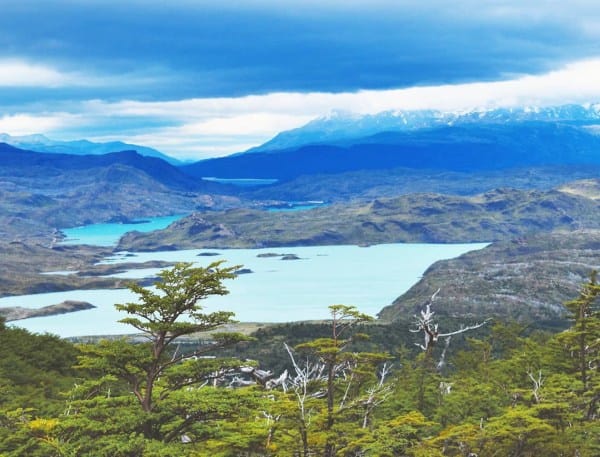
The Torres del Paine National park in Chile is one of the most beautiful and accessible national parks in Patagonia, and South America as a whole. The patchwork of varying landscapes, from rock spires to glaciers, to towering mountains nestled against streams, can be experienced on two treks through and around the park: the W trek and the circuit. In this guide, we’ll introduce and familiarize you with the W.
The W trek is a 4 to 5 day trek, commonly traveled from the eastern portion of the park to the western part with side trips (making the legs of the “W”) for epic sights along the way.
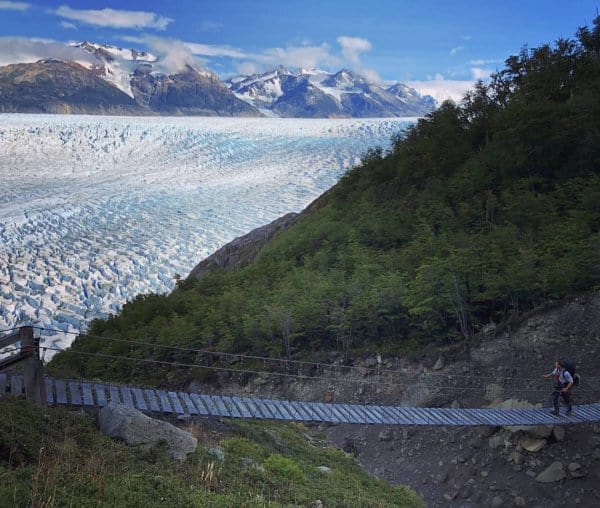
The trek starts with a hike up to Glaciar Grey, immense and beautiful.
The trek continues into Valle Frances, with a hanging glacier, small avalanches, and a lush forest cascading down the inclined valley.
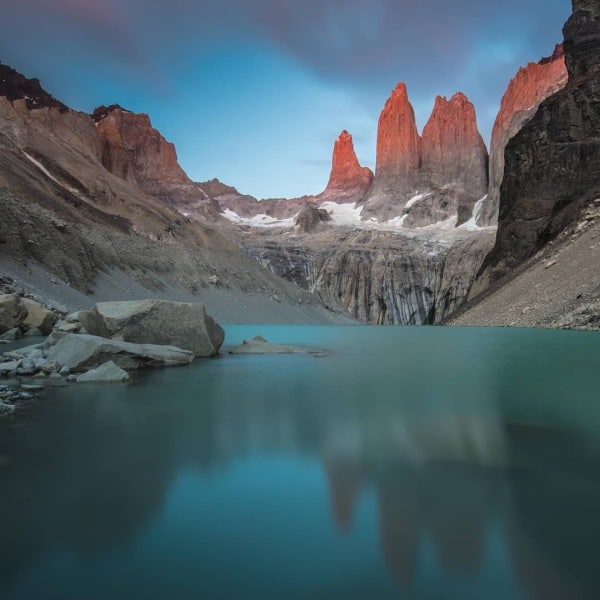
The five day trek culminates with a pre-sunrise hike to see the magnificent “Torres del Paine” with a sunrise backdrop making them seem to be on fire.

Torres del Paine W Trek Quick Facts
- Distance of the “W” Trek: ~70 Kilometers / ~44 Miles total over 5 days
- Average Distance and time per Day: 14 km / 9 miles per day during 5.5 hours of hiking
- Total Time for the W Trek: 5 days
Quick Costs of Torres del Paine W Trek
- Low end costs (camping): $260, campsite reservations, and tent, sleeping bag, and camp cooking kit rented from Puerto Natales, transportation, and park fees
- Mid-range costs (Refugios without meals): $553, refugios, transportation, and park fees
- High end Costs (Refugios with meals): $981, refugios, 3 prepared meals daily, transportation, park fees
Highlights of the Torres del Paine W Trek
- The Torres del Paine: The rock “Towers of Paine” Namesake of the park a final viewpoint– huge rock spires with a backdrop of sunrise if you make the morning hike on the final day
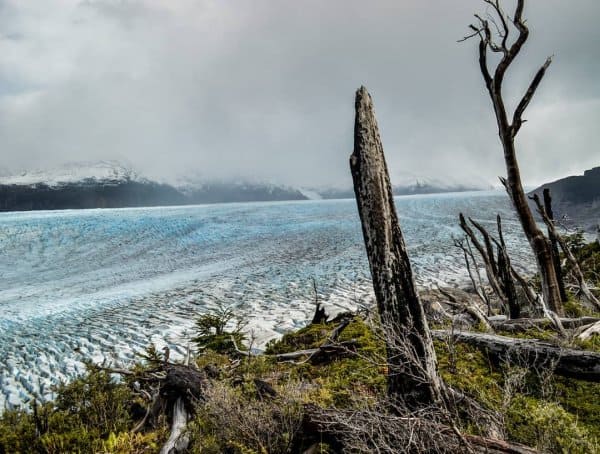
- Glacier Grey: A magnificent glacier, miles long that seems to run into the sky, seen during the first couple days of the trek
- Valle Frances: A forested valley crawling up towards the mountains and cascading glaciers serves as the trek midpoint
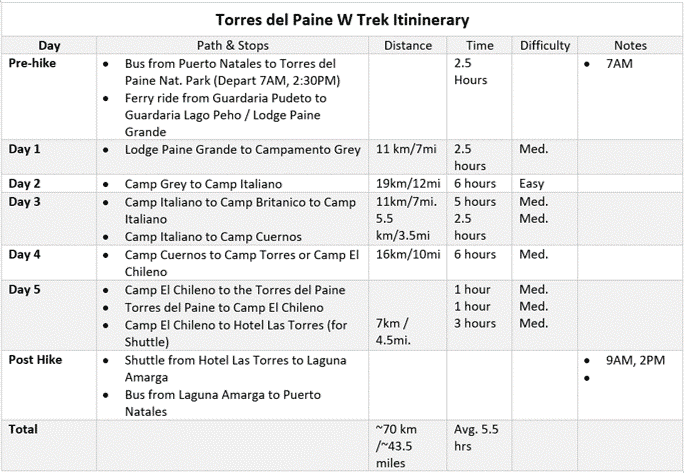
Torres del Paine W Trek Itinerary Overview
- Before Day 0: Reserve all campsites and refugios
- Day 0: Arrive in Puerto Natales, buy ticket for bus to park, buy food and rent gear
- Day 1: Bus to Torres del Paine to Guardaria Pudeto, Pay Park fee, Ferry to “Guaradria Lago Pehoe”, hike to Grey Campsite, Camp there for the evening(2.5 hrs, 7mi / 11km) ($22+$31+$26+$7.50 = $84.50)
- Day 2: Short hike to see Glacier Grey, hike back down to Campamento Italiano (6 hrs, 19km/12mi) (Free)
- Day 3: Hike up Campamento Britanico for a view passing valle Frances, hike back down to Campamento Los Cuernos (7.5 hrs, 10.5km/16.5mi.) ($21)
- Day 4: Hike up to Campamento Torres or Campamento El Chileno (6 hrs, 10mi/16km) ($21)
- Day 5: Wakeup early and see the Torres del Paine by sunrise, hike down to Torres Hotel, shuttle to park entrance, bus back to Puerto Natales(5hrs, 5.5mi/10km) ($5)
Note: All costs are for the “budget option” (camping, self-prepared meals, etc.) during high season
Other Costs
- 4 Night Gear Rental (rented in Puerto Natales): ~$25 x 4 = 100
- 5 Nights Camp Meals (purchased in Puerto Natales): ~$50
Map of the Torres del Paine Trek
Torres del Paine W Trek Itinerary
Quick Costs of Torres del Paine W Trek
- Low end costs (camping): $260, campsite reservations, and tent, sleeping bag, and camp cooking kit rented from Puerto Natales, transportation, and park fees
- Mid-range costs (Refugios without meals): $553, refugios, transportation, and park fees
- High end Costs (Refugios with meals): $981, refugios, 3 prepared meals daily, transportation, park fees
- Average campsite cost per day: $21 USD per night
- Average refugio cost per day: $116 USD per night
- Average food cost per day purchased at refugios: $107 USD per day
- Average food cost per day bought in Puerto Natales: $5 to $10 per day
- Average daily gear rental from Puerto Natales: $17 USD – Tent, sleeping bag, camp kitchen
(Keep reading or Jump to the full cost breakdown)
Full Torres del Paine W Trek Itinerary & Guide
Preparation Before Day 0: Reserve all campsites and refugios
In preparation for your Torres del Paine W Trek, book your accommodations (refugios and campsites) in the park and Puerto Natales as soon as possible. Campsites and refugios require advanced reservation and they all fill up quickly, so booking your campsite or refugio as early as possible is best.
Print all of your campsite and refugio booking confirmations. Though email confirmation on a smart phone works, things go wrong and you won’t be allowed a site if you can’t show proof of your accommodation booking.
Buy your staple trekking gear before arriving. This gear is the gear that’s hard to find with a perfect fit, that can be costly, and that’ll you’ll (hopefully) for years to come. By choosing the right gear and buying it in advance you’ll save lots of money and be much more comfortable along the way.
For anyone who plans to spend time in the outdoors, here are the trekking staples I recommend buying:
- Rain jacket (waterproof and windproof)
- Compressible, insulated coat aka “loft layer” – water resistant down or synthetic insulation
- A lightweight “mid layer” – such as a light quarter zip or full zip fleece
- A “base layer” t-shirt that is moisture wicking and quick drying
- Pants suitable for trekking – quick drying at minimum, wind and water resistance is plus, but avoid cotton
- Long underwear – wool or synthetic
- Hiking socks – merino wool ideally, synthetic works, avoid cotton
- Headlamp with extra batteries
- Trekking backpack – between 40L and 60L, with a padded hip belt
- Beanie – Ideally wool, any other insulating material will work, avoid cotton
Also consider
- Balaclava
- Sunglasses
- Windproof and waterproof gloves
Day 0: Arrive in Puerto Natales, buy ticket for bus to park, buy food and rent gear
When you arrive in Puerto Natales, and the day before your departure to Torres del Paine, use the day get the information for your trek, rent gear, to buy your bus ticket to the park, and get enough cash
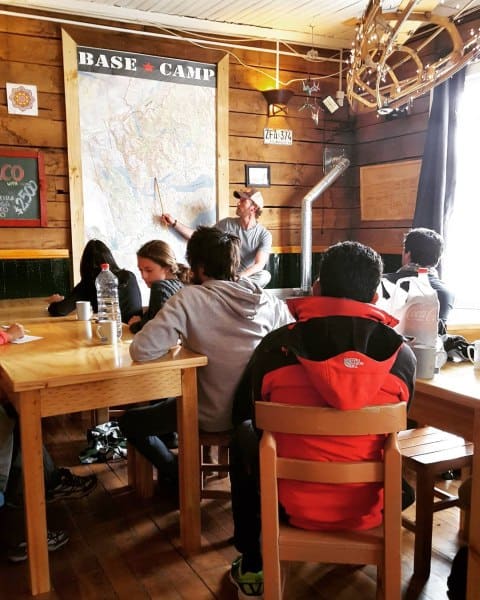
Get the Torres del Paine Trek information at Erratic Rock Hostel’s info session: Go to the daily Torres del Paine trek information at Erratic Hostel at 3:00PM. If you only take one piece of advice from this guide, then do that. The information session is absolutely free, given by staff that have done the trek countless times, and tell you everything you need to know for the trek. This session is especially good for first time trekkers as they’ll coach you through gear, packing, food, the right itinerary (the same one on this page), “need to know” info, and everything else necessary to do the trek successfully, comfortably, and on a budget.
Rent and Buy Your Gear: Using our gear list, pick up all of the missing pieces of gear you’ll need for the trek. Erratic Rock Hostel is great for renting good gear from knowledgeable and helpful staff, and if they’re out of gear they’ll point you in the right direction. Outside of Erratic Rock, just wander and look for the many “gear rental” signs.
Inspect your gear closely for damage and make sure tents, sleeping bags, and anything that inflates is free of holes.
Buy your bus ticket to the park if you have time. Buy a roundtrip ticket for 7AM. The ticket will cost $15,000 CLP (~$22 USD) and can be purchased at the Puerto Natales bus terminal. Buying in advance ensures you leave on the morning bus and avoid wasting time in line buying tickets the morning of departure.
If researching transportation in advance, these are the websites for the major bus companies
- www.busesfernandez.com
- www.busespacheco.com
- www.bus-sur.cl
- www.busesgomez.com
Get cash in Chilean Pesos: Fees in the park, for entry, shuttles, catamarans, and food at the refugios, is all paid in cash, Chilean currency, so bring plenty with you.
Day 1: Bus to Torres del Paine to Guardaria Pudeto, Ferry to “Guaradria Lago Pehoe”, hike to Grey Campsite, Camp there for the evening(2.5 hrs, 7mi / 11km)
Costs: Bus: $22, park fee $31, Catamaran $26, Camp Grey $7.50 = Total $84.50
On day 1 of the trek, arrive at least 10-15 minutes before your bus and depart at 7AM.
The bus will arrive at the entrance to Torres del Paine (Laguna Amarga Gate) at ~9:45AM. At the Laguna Amarga gate you’ll offload the bus and pay the Torres del Paine park entrance fee ($21,000 CLP / ~$31 USD for foreign adults). Here trekkers doing the 9 day Torres del Paine Circuit hike will begin their hike but you will re-board the bus and ride for “Guarderia Pudeto”, at the edge of lake Pehoe for the catamaran.
Take the Catamaran across the lake to the Lake Pehoe Ranger Station and Information Center, also located next to the Paine Grande Lodge.
Your trek truly starts here, so hit the trail!
Head west then north for Refugio and Camp Grey, for a nice, 2.5 hour, 7 mile (11km) walk along a beautiful hillside in view of an icy blue lake and awe inspiring glacier.
Stay at Camp Grey for the night, for a cost of $7.50. Feel free to head into the Refugio to buy a delicious beer to celebrate the start of your trek.
Day 2: Hike to see Glacier Grey, hike back down to Campamento Italiano (6 hrs, 19km/12mi)
Costs: Camp Italiano – Free
Start your morning with an early rise and a quick hike. Leave your tent up with gear inside and hike north on the trail toward Glacier Grey.
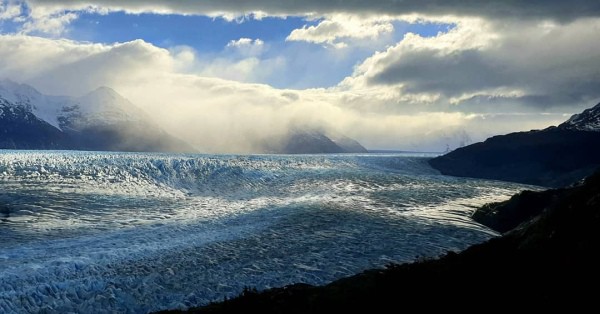
Glacier Grey is possibly the most underrated view in Patagonia. This flowing river of ice extends for 28 km, far beyond view, and its bluish white surface appears to dissolve into the sky like a pathway to heaven. Its so unreal that it looks like something between a painting and a thought. Of all of the things not to miss in Torres del Paine, Glacier Grey is one of them.
To get a great view of Glacier Grey, simply walk north on the trail. The further you walk the better the view will get, until it culminates just past Campamento Las Guardas.
This little hike has the conundrum of having no real end, you just walk until you’ve seen a sufficiently satisfying view of the glacier, enjoy it and turn around. However, keep in mind that you will still have a 6 hour and 12 mile hike to make to Camp Italiano.
After you’ve seen your fill of Glacier Grey, pack up your tent and head south.
Retrace your steps south, past Paine Grande Lodge and the Lake Pehoe Ranger Station until you’ve reach Camp Italiano, at the midpoint of the trek.
Camp Italiano is free, but count on there being minimal services at the camp. Note that though Camp Italiano (Run by CONAF) is free, you will still need a reservation and proof of that reservation.
Day 3: Hike up Campamento Britanico for a view passing valle Frances, hike back down to Campamento Los Cuernos (7.5 hrs, 10.5km/16.5mi.)
Costs: Camp Cuernos $21
Wake up with the sunrise, leave your tent with gear at camp Italiano, and start the 7 mile and 5 hour hike through Valle Frances towards Camp Britanico and the mirador (viewpoint). Bring your daypack, lunch (or snacks) and your coffee kit if you have it, to enjoy at the mirador.
This hike has two highlights, the views in the cascading Valle Frances that slides down the hillside, and the hanging glacier, seen from the viewpoint near Britanico.
After plenty of pics, start the return hike toward Camp Italiano. Pack up your tent and gear and continue moving for 3.5 miles and 2 hours to Camp Cuernos (run by Fantastico Sur for $21 per night).
Day 4: Hike up to Campamento Torres or Campamento El Chileno (6 hrs, 10mi/16km)
Costs: Camp Torres or Chileno $21
Start this day early as a strenuous hike is ahead, not too long, but the uphill might be annoying at times and you’ll carry all of your gear the entire way, so pack up everything and get moving.
When booking, choose either Camp Torres or Camp Chileno. Either option is great though Camp Torres is closer to the Torres del Paine making the following morning’s hike significantly shorter.
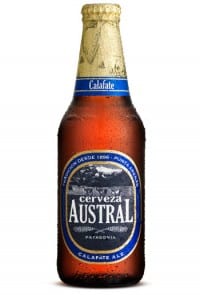
After you’ve arrived and checked in, visit the refugio to relax. If you haven’t yet, try the local Patagonia beer “Austral Calafate Ale” made from the Calafate berry. It’s a beer that’s only made in Patagonia and uses a berry that is found only in Patagonia…and quite delicious. When traveling I love quintessential experience that can’t be replicated elsewhere and have a beer made locally, available nowhere else, and in some of the most beautiful territory on the planet definitely makes for a “quintessential experience”.
Treat yourself to a hearty meal and an early night, as you’ll need to wake well before first light to make the full Torres del Paine sunrise experience.
I recommend prepping your daypack for the Torres experience the night before to making starting easier in the AM.
Don’t forget to bring your head lamp, insulating layers, an on the go breakfast, and a kit to make coffee or soup if you have. Read on to see why….
Day 5: Wakeup early and see the Torres del Paine by sunrise, hike down to Torres Hotel, bus out(5hrs, 5.5mi/10km)
Costs: Shuttle from Hotel Las Torres to gate of Torres del Paine $5
Wake up early to make it to the Torres del Paine viewpoints with enough time to settle in before first light. If leaving from Camp Torres, plan on the hike to Torres del Paine taking one hour. If leaving from Camp Chileno, plan on the hike taking 1.5 hours.
Bring everything you prepared the night before, and bring your sleeping bag with you as well. Here’s why…
How to do the Torres del Paine sunrise experience properly:
The Torres del Pain sunrise experience is the climax of the Torres del Paine treks, for both the W and the O.
The spires of rock tower above everything around for miles with an icy blue lake sitting just in front with rocky nooks and crannies throughout. To do the sunrise experience right, stake out a comfortable hole, curl into your sleeping bag wearing your warming layers, and relax.
As sunrise approaches, the golden light will shine from behind the spires, gradually setting them on fire with an orangish glow. Making it before first light makes all of the difference. As you sit there with this beautiful view, likely cold and tired, offset it by making a cup of coffee, cocoa, or soup to enjoy, and this experience will go into your memory bank as one of the best in the outdoors.
After the sun has risen behind the Torres del Paine and you feel completely satisfied pack up and return to your campsite, pack up the rest of your gear, and hike down towards the Hotel Las Torres. At the hotel, the shuttle (~$5) will leave at roughly 2 PM taking you to the park’s entrance (Laguna Amarga gate) for the 2:30 PM bus from Torres del Paine to Puerto Natales. Your original ticket purchased was a round trip ticket and you’ll need it for your ride back to Puerto Natales, so keep it safe and have it handy.
Relax, reflect on the memories, and soak up the view on the ride “home”.
Congratulations, you’ve finished the quintessential hike of Patagonia J
Should you do the W trek on a tour or self-guided?
When it comes to trekking and outdoor experiences, I always recommend self-guided over tours for a few reasons.
First, self-guided is usually cheaper by 50% to 75%, leaving money free for other great travel and adventure experiences. This is the case with Torres del Paine. Go self-guided and that extra money will easily pay for a wine tour in Mendoza or a flight to the Galapagos Islands.
Second, trekking independently builds character in a fun, useful way. Very rarely in the world we live in do you get raw experiences like just living in the outdoors for days. Let someone do the dirty work of planning, cooking, and cleaning, and you compromise the beauty and potential personal growth in the experience.
Last, because, at points, you’ll have the forest all to yourself. Complete quiet. No footsteps. No cars. No noise. Just you and one of the most beautiful places on the plan. Trek with a tour (and a herd of tourists) and kiss your peace and serenity goodbye.
| Self Guided Trek | Tour |
| Pros: Much cheaperAllows for more flexibility Torres is one of the easiest places to start trekkingGear rental is very easy – Well marked paths with well-spaced campsites make life easy for first-time trekkers | Pros: Easier |
| Cons: Requires planningRequires reserving individual sites (campsites, refugios) far enough in advance | Cons: Expensive |
| Who Self Guided Trek is best for: Backpackers and budget travelers – Those who want a more genuine experience – Those who want a quieter experience | Who Tours of Torres del Paine are best for: ElderlyTight schedules & busy peopleTravelers with too much money |
Full Torres del Paine W Trek Costs
The cost of trekking through Torres del Paine can be anywhere from relatively cheap (~$250 USD) to relatively expensive ($1000+ USD) depending on whether you camp, stay in refugios, bring your own food, or eat in refugio “restaurants”. Below, you’ll find a snapshot of costs in Torres del Paine so you can plan your budget and adventure accordingly.
Quick Costs of Torres del Paine W Trek
- Low-end costs (camping): $260, campsite reservations, and tent, sleeping bag, and camp cooking kit rented from Puerto Natales, transportation, and park fees
- Mid-range costs (Refugios without meals): $553, refugios, transportation, and park fees
- High-end Costs (Refugios with meals): $981, refugios, 3 prepared meals daily, transportation, park fees
Average Costs for Trek
- Average campsite cost per day: $21 USD per night
- Average refugio cost per day: $116 USD per night
- Average food cost per day purchased at refugios: $107 USD per day
- Average food cost per day bought in Puerto Natales: $5 to $10 per day
- Average daily gear rental from Puerto Natales: $17 USD – Tent, sleeping bag, camp kitchen
Park Fees
- Foreign Adults: $21,000 CLP (~$31 USD)
- Foreign Children: $6,000 children (~$9 USD)
**Fee includes park map
Transportation Fees
- Bus ticket from Puerto Natales to Torres del Paine (roundtrip): $15,000 CLP (~$22 USD)
- Catamaran ride from Pudeto to Paine Grande: $18,000 CLP (~$26 USD) One Way
Individual Campsite Costs:
- Camp Las Torres (Fantastico del Sur): $21 USD/Night (High Season), $16 USD/Night (Low Season)
- Camp El Chileno (Fantastico del Sur): $21 USD/Night (High Season), $16 USD/Night (Low Season)
- Camp Torres (CONAF – unavailable 2018-2019): $21 USD/Night (High Season), $16 USD/Night (Low Season)
- Camp Grey (Vertice Patagonia): ~$7.50 USD/Night ($5,000 CLP)
- Camp Italiano (CONAF): Free but requires reservation via CONAF reservation site and email confirmation
- Camp Frances (Fantastico del Sur): $21 USD/Nigh (High Season), $16 USD/Night (Low Season)
- Camp Cuernos (Fantastic Sur): $21 USD/Nigh (High Season), $16 USD/Night (Low Season)
(Click to view a full list of Torres del Paine Campsites)
Individual Refugio Costs
- Refugio Chileno: $116 USD/Night (High Season), $95 USD/Night (Low Season) [Fantastico Sur]
- Refugio Cuernos: $116 USD/Night (High Season), $95 USD/Night (Low Season) [Fantastico Sur]
- Refugio French: $116 USD/Night (High Season), $95 USD/Night (Low Season) [Fantastico Sur]
- Refugio Paine Grande: $57 USD / $34,000 CLP [Vertice Patagonia]
- Refugio Grey: $37 USD / $22,000 CLP [Vertice Patagonia]
- Hotel Los Torres Patagonia: From ~$80 USD per night
(Click to view a full list of Torres del Paine Refugios)
Fantastico Sur Campsites and Refugios Price List
Average Gear Rental Costs (when rented from Puerto Natales)
- Sleeping bag: $3,000 CLP
- 2 person tents: $4,500 CLP
- Cooking kit (complete): $4,000 CLP
- Sleeping mat: $1,500 CLP
- Trekking poles (2): $3,500 CLP
- Waterproof jacket: $3,000 CLP
- Waterproof pants: $3,500 CLP
- Backpack: $4,000 CLP
- Down Jacket: $2,500 CLP
- Gloves: $1,500 CLP
- Headlamp: $1,500 CLP
Gear Rental (in park at campsites and refugios)
- Two person tent: $27 USD/Night ($20 USD Low Season)
- Sleeping Bag : $23 USD/Night ($16 USD Low Season)
Meal Costs (in Park, served at refugios)
- Breakfast: $21 USD
- Boxed Lunch: $26 USD
- Full Lunch: $39 USD
- Dinner: $39 USD
- Beer (celebratory): $4,000 CLP (~$6.50 USD) each
Meal Costs (for campers bring food from Puerto Natales)
- Food (daily): ~$5 USD to $10 USD per day, if purchased in Puerto Natales
- Eggs:~$300 CLP each (~$.50 USD) (purchased in park)
Torres del Paine Trek Preparation Checklist
To make your Torres del Paine W trek or circuit trek the best possible, ensure you’ve done everything on this checklist prior to departure
- Book (or plan) transportation into Puerto Natales
- Book transportation by bus from Puerto Natales to Torres del Paine
- Book refugios or campsites for the duration of the trek
- Print and bring all bookings
- Rent or buy all necessary gear (tent, sleeping bag, camp kitchen, etc.) in Puerto Natales or reserve online (with accommodation bookings)
- Go through the full Torres del Paine packing list to ensure you have gear for rain, cold, shelter, sleeping, and cooking
- Waterproof pack all gear by lining backpack using trash bags, and bring a couple extra
- Bring cash in Chilean Pesos to pay for park fees, boat trips, shuttles, food, beers, and incidentals
- Get familiar with all of the campsites you’ll be camping and the best departure times for experiences (e.g., Torres del Paine by sunrise), avoiding crowds, and arriving before dark
Gear and Essentials for the Torres del Paine W Trek
The Torres del Paine Treks, both the W and the circuit, are very enjoyable walks in the park (literally) as long as you’re prepared.
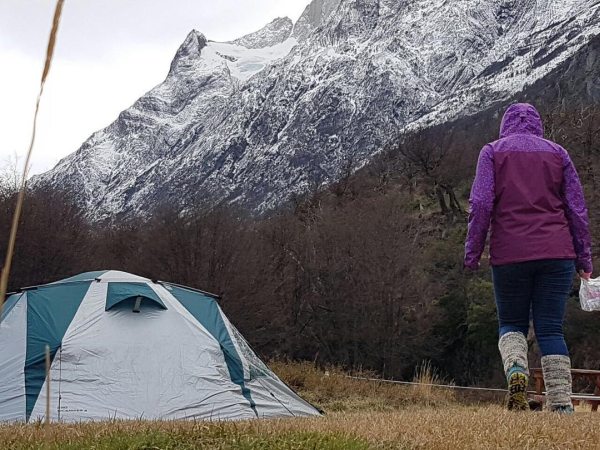
To stay warm, dry, and comfortable you’ll need to plan for Patagonia’s notoriously schizophrenic weather. Due to the height and shape of the mountain range and the surrounding topography, weather through Patagonia (including in Torres del Paine) can change drastically and quickly. You could start the morning with clear skies and sunshine, yet endure a monsoon like rainstorm or light snow in the afternoon. As such, plan for the right equipment to stay warm and dry both during the day and at night.
The enjoyable walks each day will be taxing. To stay fueled up you’ll need to plan satisfying, comforting, and nutritious meals that are still light to carry and easy to prepare. Pair this with a good camp stove and mess kit to keep the nights enjoyable.
Last, there are small things that can make potential disasters or large inconveniences simply laughable stories. Using a trash bag to waterproof your backpack. Carry hand sanitizer to clean hands and cuts. A hot beverage (I love my cocoa) and a headlamp (not a regular flashlight) for the evenings. These, and other things listed, will add a level of camper’s luxury to your trek.
Read on for the full Torres del Paine packing list
Should you buy gear or rent?
For trekkers on a budget that spend time outdoors often enough (or plan to) a combination of purchasing some pieces of gear and renting others in Puerto Natales will be the best option.
If you’re traveling around South America out of a backpack, some large items are too bulky to carry continuously. Given how cheap and accessible gear rental is in Puerto Natales, I would recommend renting your tent, sleeping bag, and cooking kit in Puerto Natales at Erratic Rock or another gear renting establishment (there are plenty).
Note that though you can rent tents and sleeping bags in Torres del Paine, directly, from the campsite or refugio, these require reservation and the prices are ridiculously expensive.
Which gear should you buy? Which should you rent?
If you plan to explore the rest of Patagonia and the outdoors of South America, such as El Chalten, Bariloche, and the newest national park then it may be worth purchasing a sleeping bag and tent when you reach Patagonia. The costs will even out and the money will buy you better gear – or just bring your own from home.
In 2012, before my first Torres hike, I hadn’t even planned on going to Patagonia, so the entire trip was impromptu. I ended up buying a tent and camp stove in Bariloche, using them throughout the trek, and I actually still use them today, so don’t worry about finding good gear to rent or purchase
In any case, I recommend bringing your own clothing and layers (e.g., rain jacket, insulating layers, gloves, socks, etc.), your own well-worn boots, and your own trekking backpack. It will be harder to find high quality versions of these items that fit you (for cheap) so you’re better off bringing them.
Where to buy gear for Torres del Paine
Puerto Natales and Punta Arenas: several shops rent and sell gear, most of decent quality but expect to pay prices comparable to US or Europe
San Carlos de Bariloche, Argentina: If you are passing through Bariloche and the lake districts, name brand gear and local brands of good quality can be purchased for a decent price. If you’re camping and trekking in Bariloche, feel free to load up on gear to use later.
Thrift stores throughout Patagonia: Throughout southern Argentina and Chile and Patagonia in general have an amazing array of outdoor gear of high quality for extremely cheap. As long as you don’t mind off colors or something a few years old, you’ll find plenty of Patagonia and Northface gear for pennies on the dollar.
Where to rent gear
Erratic Rock hostel is the most reliable place to rent gear, in terms of quality, but they’re frequently rented out of everything. Erratic Rock is still a great place to start as they’ll point you in the right direction for the next best place to rent.
Wander around and look for gear rental signs: Puerto Natales almost exists solely for Torres del Paine meaning if you wander the streets it will be hard not to miss the countless gear shops.
Check gear thoroughly and take pictures of “busted bits” as you’ll be responsible for it on return
Torres del Paine Packing list
(For a more detailed packing list and choosing the right gear check out our full Patagonia and Torres del Paine Packing List)
Trekking Backpack: Comfortable trekking backpack between 40L to 60L with waistbelt recommend the REI Trail 40
Light, stowable daypack: Recommend the REI Flash 18 or REI Flash 22
Camp gear (if staying in campsites and not refugios)
- Tent (go lightweight)
- Camp stove with gas and one plate, bowl, cup, and fork/knife per person. I recommend bringing a jet boil (also available on Amazon for cheap) or a solo stove and rent plates, cups, bowls, and utensils in Puerto Natales
- Synthetic sleeping bag
- Sleeping pad
Trekking Clothing
Also check out our expanded packing list with details on how to pick each item
- Comfortable trekking shoes or boots (need to be broken in)
- Rain jacket
- Insulation’/loft layer (down or synthetic insulated coat)
- Mid layer
- Sweat wicking base layer (shirt), synthetic or wool
- Long underwear, synthetic or wool
- Pants for Trekking
- Pants for hanging out in camp (clean pair) and sleep in
- Shirt for lounging
- Shorts (optional)
- 2-3 Pairs of underwear
- 2-3 pairs socks for trekking
- Gloves (windproof and waterproof)
- Hat
- Sunglasses
- Balaklava
Footwear
- Hiking boots or trekking shoes
- Flip flops or Trekking sandals
Hygiene
- Flushable Baby wipes
- Hand sanitizer
- Basic first aid kit (sports tape, gauze, sanitizer, pain reliever, superglue)
- Quick drying camp towel
- Toilet paper roll
- Sunblock
Accessories
- Trash bags for waterproofing (instead of dry bags)
- Large Ziploc bags for organizing and waterproofing (instead of dry bags)
- Lighter
- Portable charger
- Smartphone or camera
- A good book or kindle
- Cash
- Krazy Glue
- Gorilla tape or duct tape
- Two liter sized water bottles or Nalgene bottles
- Trekking poles
- Map
How to layer and wear your clothes on the trek
Packing a trekking wardrobe of strategic “layers” allows you to add or remove layers to increase, decrease, and maintain your body’s temperature through heat, rain, and snow. Adding a couple extra items that are windproof and waterproof allows you stay dry and avoid losing warmth even better.
Make sure your kit includes the following layers for trekking
(From outer to inner)
- Rain jacket with sealed seams to keep out wind and water
- Loft layer coat for warmth (down jacket, synthetic jacket, or heavy fleece)
- Mid layer shirt/jacket for light warmth (a lighter fleece or half zip)
- Base layer shirt that dries quickly and wicks sweat
- Beanie – synthetic or wool
- Gloves – windproof if possible
- Quick drying, sweat wicking, funk resistant underwear
- Water and wind resistant pants
- Long underwear made of wool or synthetic
- Wool or synthetic socks (one pair for warmth at night, one for hiking by day)
Food and water on the trek
To stay happy and healthy on the trek, good food and water is necessary. Though good water is easy to come by, good food (for cheap) is a little more difficult and requires planning. Read on for how to plan for both food and water during the Torres del Paine treks.
Food
Prepared food is available at refugios throughout the park, but if you’re not careful then food costs (at $30 to $40 per meal) can total more than the price of your entire trek.
For budget travelers, the best option is to plan and pack the meals for your entire trip, purchasing the food in Puerto Natales, and hiking it in.
For the most fulfilling experience yet lightest bag, plan a quick and tasty breakfast (candy bars alternated with single bag hot cereal), on the go lunch (dried fruits, nuts, granola, cured meats), and a hearty dinner.
You’ll need 4 breakfasts, 5 lunches, and 4 dinners.
Here is a meal by meal tip list
Breakfast: Bring two types of breakfasts: candy bars, and readymade hot cereal
- Candy bars: Snickers are the most underrated trekker’s breakfast. They’re delicious (which starts you off with a smile), packed with carbs, fats, and sugar to readily burn, and you can eat them on the go – which saves you time. Any candy bar with a mix of nuts will work. Aim for 400-700 calories to get enough nutrients, depending on your body type
- Readymade Hot Cereal: There is something comforting about a warm meal, so start off half of your days with readymade hot cereal – like oatmeal or porridge. Make this by combining your choice of instant hot cereal (like oat meal), powdered milk, and sugar/sweetener into a single bag, and set aside just enough for your trek. To prep in the morning, just boil water for your cereal, pour in, and use the rest for your coffee/cocoa.
Lunch: Keep lunch simple by going for high nutrient “on the go” foods.
Aim for foods that you can eat while walking. Granola, nuts, and dried fruits make the best option. Shelf stable meats and bread (for sandwiches) are a close second. Peanut butter and jelly sandwiches are just as great
- Granola, nuts, and dried fruits: Staples for most trekkers, but beware these can get old quickly. Bring enough to have 500-700 calories for every serving. I highly recommend hitting the dried fruit shops in Puerto Natales as they have a selection of dried goods that taste like candy but are great for you – dried strawberries, hibiscus flowers, tropical fruit, and many others to keep you smiling.
- Shelf stable meats and cheeses with bread: Meats such as salami and prosciutto paired with dinner rolls make perfect bite sized, on the go sandwiches. No refrigeration required makes it easy to still get your protein (and tastiness) on your trek.
- Peanut butter and jelly (or honey) sandwiches: Possibly the most perfect adventure food. The sugar will give you a quick boost of energy, the fats (from the peanut butter) provide the slow burning fuel needed for trekking, and the combination of peanut butter and bread makes a complete protein. The peanut butter and jelly is one of the cheapest, most balanced, and most complete trekking food options
Dinner: Go big, go comfort
- For dinner, pack in hot meals with comfort foods, lots of calories, and protein. You’ll want your dinner meal to be at least between 700 to 1000 calories in total.
- Pairing a starchy dry good, like rice or pasta, with a flavorful topping, like a dry packaged gravy or sauce, and adding a source of protein to the side is the best way to go.
- To step up your camp meal, bring garlic, onion, or a small container of spices. DO NOT forget pepper and salt.
Limit canned goods because any trash you create has to be dragged out – by you or someone else
Here are a few ideas for building your hearty camp dinners with filling, flavorful meals.
Dinner Meal Cheat List
Simply take a starch, sauce, and protein and improvise some magic. You should have something tasty, but at least you’ll have the nutrition to get through the next day
- Starch (for calories): Rice, pasta, dried potatoes
- Sauce: Dry packaged dressings, gravies, or sauces
- Protein: Spam, shelf stable meats, eggs
- Spices and seasonings: Salt, pepper, garlic powder, onion powder, hot sauce
General Suggestions for camp meals
- Plan daily in individual meals – aim for single bag meals – only take what you’ll eat
- Go dry (less moisture) for lighter weight
- Hit the dried foods stores in Puerto Natales , “Frutos Secos” (Google Map Location) I highly recommend the dried hibiscus
Food hack #1: Olive oil
Quick on-the-go hunger fix
Olive is a healthy and dense source of good fats. A single tablespoon has over 100 calories, which ¼ of a candy bar, about the same as a handful of nuts, and other options. Though you can’t survive on olive oil alone, you can stave off hunger and stay fueled by downing a tablespoon of olive on the move.
Similar to the trendy “bulletproof coffee” this hack gives your body a shot of healthy calories – as long as you’re walking them off they won’t stick to your butt.
Take a small bottle with you to add calories (and flavor) while cooking, and keep this food hack in mind when you’re hungry but racing to make it to your campsite before dark.
Food hack #2: Peanut butter or almond butter
On the go meal
Just like a spoonful of olive oil, a spoonful of peanut butter can do wonders when you’re starving/dying/moody as it delivers fats and carbs – the two main fuels you need to stay moving. If you happen to have a piece of bread around, shove that in your mouth and you have a complete proteins as well and ultimately everything your body needs to keep moving.
Where to buy food for the Torres del Paine trek
In prep for the Torres del Paine W Trek, you have three main options for purchasing food:
- Unimarc
- Bulk food stores and small markets around Puerto Natales
- Punta Arenas
Unimarc is the town supermarket, and every trekker in town will raid this place first. Plan on the selection varying between pricey and scarce depending on how soon after restocking you arrive. You’ll find most of your standard brands and plenty of other options here, but check out the bulk food stores and local markets before committing to too much.
Bulk food stores in Puerto Natales are my favorite as they have a great selection of dry goods such as dried fruits (even dried, sweetened hibiscus leathers), rice, beans, pastas, and plenty of other great trekking options
Punta Arenas is a great place to stock as the selection of foods will be wider and cheaper here. If you’re passing through, stop by the grocery stores and if you find some foods you really like then pick them up – you’re not likely to find them in Puerto Natales
Water on the Trek
Sources of water are plentiful, and the park advertises that stream water is clean, however, I recommend sticking to marked potable water resources (faucets) and bringing water purification tablets that can be purchased cheaply in Puerto Natales to use on stream water.
Thought the water in Patagonia is much cleaner than other places, the high traffic in the park makes it possible that you collect water downstream from where a human or animal has contaminated it.
Play it safe and collect water only from marked potable water resources, or use purification tablets on your water.
Bring 2 to 3 water bottles that are about a liter in size. The “cheap” plastic water bottles are the best as they’re cheap and lightweight – if you don’t feel like purchasing reusable water bottles. The average woman requires at least 2 liters of water daily and the average man requires 3 at minimum.
Having 2 liters of water on you at the start of your trekking day will be more than enough to get you between watering points, and will make cooking and cleaning easier without
Getting to Torres del Paine National Park
To start your trek in Torres del Paine from Puerto Natales you’ll take a public bus from Puerto Natales to Torres del Pane entrance gate (Laguna Amarga), a shuttle from the entrance gate to the lake (Pudeto station), a catamaran across the lake to Paine Grande Lodge, and finally start your trek there.
Now for the details
Once you’re in Puerto Natales, getting to Torres del Paine is quite easy. Buy your ticket one day in advance (if possible) from the main bus station in Torres del Paine for $15,000 CLP (~$22 USD) including return trip. The main bus companies that operate these buses are
- www.busesfernandez.com
- www.busespacheco.com
- www.bus-sur.clb
- www.busesgomez.com
The busses from Puerto Natales to Torres del Paine leave daily at the 7AM or 2:30 bus from Puerto Natales bus station. They arrive at Laguna Amarga gate ~9:45AM and 4:45PM respectively, at the entrance to Torres del Paine, a few hours later.
Aim for the 7AM bus and you’ll make it into the park and trekking by 11AM
After the dropoff at Laguna Amarga gate, you have the choice of hiking in (90 minutes) or taking a shuttle to “Pudeto”, at the edge of the lake. The shuttle will cost ~$5 USD payable in Chilean Pesos and arrives at ~10:30AM and ~5:30PM respectively.
At Pudeto, take the Catamaran to Guaradaria Lago Peho / Paine Grande Lodge (in the same location). This ferry ride will cost $18,000 CLP (~$26 USD) One Way.
From here…start trekking! Head north to Grey Glacier and your trek has started.
Leaving Torres del Paine
To get from Torres del Paine to Puerto Natales, the process happens in reverse with pickup at Pudeto at pickup at Laguna Amarga at 2:30PM and a shuttle leaving from Hotel Las Torres for Laguna Amarga at 2:00PM daily.
Other Routes in Torres del Paine
- The Torres del Paine Circuit: Adds the “backside” of the park to the W trek for a more backcountry, remote trek – view the Ultimate Torres del Paine O Circuit Trek Guide for more, great info
- Torres del Paine Day Trek: Take the 7AM bus from Puerto Natales to Torres del Paine, start hiking by 11 to make the 8 hour /11 mile trek up to the Torres and back to the Hotel Las Torres – taking a shuttle and bus, or private transport back to Puerto Natales. Consider hiring a full tour for this trek due to transportation issues that arise with late returns to Puerto Natales.
Safety and travel insurance
When you’re venturing into the unknown, travel insurance is often a good idea. On treks like these in remote areas, small mishaps (like sprained ankles or deep cuts) can turn into big costs when the nearest hospital is hours away. The extra $50-$100 of travel insurance may save you $1000’s later.
On the Everest Trek, I specifically used World Nomads due to great reviews from close friends. Though I didn’t need to use it, they were responsive to any inquiries, gaining my trust – and my friends that had a staph infection and another who was helicopter lifted out were taken care of fairly by World Nomads.
Beyond prepping with travel insurance, here are a few good tips for safety and health
- Avoid refilling with water near where people camp or walk
- Bring hand sanitizer and use it liberally
10 More Tips to make your Torres del Paine Trek better, easier, and cheaper
- Use garbage bags as liners to waterproof your bag – don’t count on backpack covers
- Have a beer at the refugio near the Torres, and have the Calafate berry beer
- Use Snickers bars (or some other ready to eat item) for breakfast – avoid hot meals for breakfast
- Do one hot meal daily
- Take a synthetic (not down) sleeping bag
- Count on rain at some point
- Book accommodation (campsites and refugios) well in advance
- Stay at the Tin House (they have amazing mattresses)
- Plan for warm weather, cool nights, and wet weather (rain shells, synthetics/wool, good attitude)
- Bring a sleeping bag with you to the Torres del Paine (morning coffee tools are a good bonus too)
- Bring a sleeping bag liner!
- Download Maps.me with Torres del Paine maps and bring a portable charger
- Don’t be afraid to smile and make friends with singletons on the trail
- Consider doing the circuit instead
Other Patagonia attractions near Puerto Natales
- Perito Moreno Glacier: An immense glacier that is still growing and will leave you breathless
- El Chalten: Another mecca of trekking and home to the mountains on the Patagonia emblem
- Ushuaia (and penguins…and Antarctica…): The southernmost city in the world, gateway to Antarctica, filled with penguin tours
Frequently Asked Questions on the Torres del Paine W Trek
Should I book refugios in advance or just show up?
All accommodation must be booked before entering the park. You will e allowed to enter without accommodation bookings, but you won’t be allowed to stay
To book, checkout our article on the Torres del Paine Campsites and Refugios which includes links to the appropriate booking website for each individual camp or refugio (CONAF, Vertice Patagonia, or Fantastico Sur).
Can tickets be purchased in the park? How?
The entry fee to the park will be paid at the Laguna Amarga gate, where the bus will drop you off (and where the shuttles will pick you up). Be prepared with $ 21,000 CLP (~$31 USD) in cash, Chilean currency to pay on arrival.
How does hiking west to east compare to hiking east to west
I highly recommend hiking west to east. West to east, on a 5 day pace, gives tons of great buildup to the finale, Torres del Paine. The Torres del Paine are best seen in the morning, before first light as the sun rises up behind them. This climactic and early day culminates with a short walk down to the Hotel Las Torres and ride down to complete the trek.
Doing the trek west to east would either mean sacrificing the sunrise at the Torres or waking up extremely early for the hike the following day and then trekking through the day tired. Personally, I’m not a fan of trekking on little sleep.
Last, if you decide to travel west to east, you’ll be walking against the flow of hundreds of trekkers on narrow trails, which will get old quick. All in all, east to west is your best bet.
How does the circuit compare to the W?
The W trek is a 4 to 5 day trek that is perfect for beginner trekkers or trekkers with limited time and provides breathtaking views along the way…but…if you have the time, do the circuit instead. The Circuit includes the “backside” of the park, more remote, more wild, more quiet, and just…more. There
On the circuit there are fewer trekkers and more modest accommodations. Unlike on the W side of the trek, on the circuit you’re always surrounded by towering mountains and expansive landscapes. Plus, on the Circuit I was often trekking alone – and it felt amazing. If you have the choice between the two and the time, do the Circuit. If you’ve done the W and fell in love, go back and do the backside of Torres del Paine. Youu won’t regret it
How can I do the trek cheapest?
By doing a few things:
Stay at campsite, bringing your own (or a rented) tent and sleeping bag
Bring your own food for meals and kit for cooking
Take public transportation (the bus) into parks
Make all of your reservations, so you’re not stuck with overpriced accommodation
Go in off season, as all prices are roughly 25% outside of October to April (high season
What tour companies do you recommend?
I don’t commonly take tours but I’m looking for tours to recommend to others. Do you have any to recommend?
Is it possible to do Torres del Paine on day trips?
Yes, if you trek quickly. You can take the 7AM bus in from Puerto Natales and hike from Hotel Las Torres up to the Torres del Paine, hike down, and take a bus (or private transport) out of the park. You may also hire private transport into and out of the park to free up timelines.
If you are doing day trips, the most magnificent thing to see will be the Torres and the second most magnificent thing will be Glacier Grey. Plan accordingly.
Is there an itinerary with just the highlights?
Consider day treks to Torres del Paine or a trek to Glacier Grey, and a trek on Glacier Grey, as options for a highlights only trek. You’ll likely need to organize one way private transport to or from the park to complement the available buses. Alternatively, you could join an organized tour.
Is it difficult to hike Torres del Paine solo?
Absolutely. I’ve hiked the W and the circuit and hiked the W trek solo. The national park is so highly trafficked that you are never actually solo, you’ll always be near another trekker
If you’re new to trekking and camping and just generally nervous about the experience, its very much possible. I recommend attending Eratic Rock’s 3PM info session daily which tells you everything you need to know to do the trek. In Puerto Natales, you can rent all of the equipment you need. New trekker or experience, solo or in a team, this trek is very possible.
Should I stay in refugios or campgrounds?
If you are trying to stay on a budget or are truly outdoorsy, bring a tent and sleeping bag and stay in campsites. If you are elderly, not used to sleeping on the ground, or uncomfortable carrying weight and roughing it – and have plenty of cash – opt for refugios.
Can I rent equipment in the park?
You can rent sleeping bags and tents in the park, but they are very costly compared to renting it in Puerto Natales. At camps/refugios, a sleeping bag costs $23 USD per night and a tent costs $27 USD per night.
Can I buy food in the park?
Meals are served at the refugios but they are very costly at $20 USD a meal for breakfast and ~$40 USD for lunch and dinner
When is the best time to go to Torres del Paine?
High season is October to April. Going during the shoulders of the season will make for less traffic but cooler weather. Going outside of high season will translate to about 25% lower prices.
Can children make the trek?
Absolutely. If you have a system for trekking with your child for ~10 miles, then they can do at least part of the trek. During my trek, a couple with an infant too small to walk hiked the highlights of the W (Valle Frances and the Torres del Paine) staying at refugios along the way.
When does the bus to Torres del Paine leave from Puerto Natales?
7:30 and 14:30 daily (more info at www.busesgomez.com)
When is high season in Torres del Paine?
1 October – 30 April
How do I get back to Puerto Natales
Take the return bus from Porteria Laguna Amarga. You can get to Laguna Amarga gate via the shuttle from Hotel Las Torres
How do I get from the trail (Las Torres area) to Laguna Amarga?
A shuttle bus leaves from Hotel Las Torres at 9:00AM and 2:00PM daily. The ticket price is $2,800 CLP (~$4)
How can I prepare for the trek
Attend the 3PM info session at Erratic Rock that discusses the trek
Other Great Content on Patagonia and Trekking
- The Ultimate Torres del Paine “Circuit” Trek Guide
- The Adventure of the Everest Base Camp Trek
- The Torres del Paine Packing List
.

.
ABOUT THE AUTHOR
Carlos Grider launched A Brother Abroad in 2017 after a “one-year abroad” experiment turned into a long-term life strategy. After 65+ countries and a decade abroad, he now writes about FIRE, personal finance, geo-arbitrage, and the real-world logistics of living abroad—visas, costs, and tradeoffs—so readers can make smarter global moves with fewer surprises. Carlos is a former Big 4 management consultant and DoD cultural advisor with an MBA (UT Austin) and Boston University’s Certificate in Financial Planning. He’s the author of Digital Nomad Nation: Rise of the Borderless Generation and is currently writing The Sovereign Expat.