To build a villa in Bali is a very satisfying experience – when it’s complete. However during the process of buying land and building a house in Bali, stress and confusion will be fairly common along the way.
Do not worry.
Though language barriers, “interesting” building practices, and difficult to navigate regulations and permitting practices abound, you can simplify the experience 10 fold by understanding everything about your construction process up front, what to expect, and what to follow up on.
This does not mean construction of your villa will go over perfectly smoothly. But this does mean that you will be able to anticipate problems long before they happen. Also, by knowing what should happen you will be equipped with the knowledge necessary to check that everything is going according to the plan that will lead to a comfortable, livable, low maintenance, and satisfying Bali villa.
In this Bali Villa construction guide, I will review the Bali villa construction process step by step, and share the additional risks and warnings that every soon to be Bali villa owner should know before construction starts.


- Getting bids for your house construction
- The Construction Contract
- Construction Process Overview
- The “Surprises” You Should Anticipate While Building a Villa In Bali
My Experience: 2 years managing my home build in Bali
Over the last 2 years I undertook the daunting task of attempting to have a villa built in Bali. Unfortunately, and fortunately, due to many let downs in the process – by architects, contractors, foreman, and more – I resorted to the level of managing my own villa construction project. Day after day for 9 months, I arrived daily (sometimes twice daily) to inspect, adjust, and guide the progress of my villa. Though the product is, as I’m reminded, far from perfect I am happy with the durable, spacious, and low maintenance villa that came out of the tumultuous process.
Even more, I am happy about the lessons about construction in Bali that I learned over the 1+ year long experience. From costing the project, to contracts, to inspecting the details of foundation, structure, walls, windows, electrical, plumbing, and finish, I only wish I could have started the process of building my villa with this knowledge,
I can’t start over, and I won’t be building another home in Bali, but I can give you all of the starter knowledge you should know before building a villa in Bali.
Let’s get started by reviewing the construction process in Bali.
Getting bids for your house construction
After the villa planning documents have been completed, to include architectural plans, structural engineering plans, MEP plans, and landscaping plans, it’s time to take your Bill of Quantities listing all of the materials for your project, and get bids from contractors.
Be sure to remove the estimated prices from your BOQ, leaving only the quantities, and get quotes for at least three contractors (referred to as builders in Bali) for the entire project, highlighting what is not included, and detailing the warranty they’ll give, how long it lasts, and what they’ll cover. Be sure to only consider contractors with trustworthy recommendations, 5+ years of experience, and a portfolio of finished that you can expect. Remember, the villa won’t have (or shouldn’t have) problems in the first 6 months, but may fall apart in 2 years, so try to see an example villa that has lived through a few rainy seasons.
When you’ve found a trustworthy contractor with a proven track record of experience that offers a home warranty of ideally 1 year or more, but absolutely no less than 6 months / 1 rainy season, it’s time to write and sign the construction contract
Signing the construction contract
The construction contract will be a legal document between you and the contractor detailing the entire scope of the project, fees, penalties, warranties, and more. The construction contractor should be written in English and Indonesian and signed by both parties with a Materai stamp, as you will need the English version of the contract for reference, but realize that only contracts in Indonesian are allowable in Indonesian court – English language contracts aren’t recognized for the paper they’re printed on.

Include in the Contract
The construction contract should detail all of the following
- Time to complete the project
- Penalty fees for late completion of the project
- Warranty period and what is covered – such as 9 months warranty on the roof, 10 years on the windows, and 25 years on the bitumen waterproof roof membrane
- Payment terms and milestones: 10% deposit and amount, 25% and amount, 25% and amount, etc.
- Criteria that dictate completion of construction milestones: such as 25% at completion of all BOQ items under “foundation,” 25% payment when BOQ items under “structure” are complete
- Terms for who inspects and approves completion of building phases
Documents to include in the contract
The contract should have all planning documents (architectural drawings, structural drawings, and MEP drawings) as addendums to the original contract, with all pages initialed by both parties. This would solidify the use of your planning documents as the undisputable basis of the build.
Because of this, ensure that everything you expect to be included in the build is listed as a line item in the bill of quantities and is detailed in one of the planning drawings (architectural, structural, MEP).
From my own experience, during my build I had several instances, with changes in wiring, adjusting floor elevations, and improving wall finishes, wherein my contractor initially said the corrections would cost extra, but because we had a signed contract with clear plans, he quickly ceded to correct the work with no additional costs. For the situations in which we audibly agree on what would happen, I was often left paying for the adjustments later.
The Takeaway: Ensuring all of your villa planning documents are as accurate as possible and signed and included in the construction contract.
Contract Payment Terms
Bali is a risky place when it comes to business, because so many things are played fast and loose, and due to the anti-defamation laws you are unlikely to hear a negative (brutally honest) review of any service provider. To protect your investment in the process it is important to only provide the contractor with enough money to finish the current phase and no more. This way, if progress and relations go awry, you can fire the individual without stressing about how to get your money back.
Also, don’t rely on courts and contract to get your money back. Contracts are more so a mechanism for expressed agreement, and serve as evidence of agreed truth later at which point honor kicks in to solve the problem.
To limit excessive losses at any point in the project, I recommend a payment plan varying on the following scheme.
10% – Downpayment immediatel
25% – At 30% completion point
25% – at 60% completion point
25% – at 90% completion point
10% – at 100% completion point
5% – after warranty period completes with all work finished (6 to 12 months)
In fair deals, the remaining 5% generally represents the contractor’s profit margin
The Construction Process Overview
After the signing of the construction contract, construction of a villa is a fairly straight forward process that happens in, and can be managed in, phases.
The phases of a villa construction project are:
- Site Prep: Building access roads, water access/well, septic, building workers’ houses, securing electricity
- Sub-structure: Drilling bore piles, foundation walls, pile caps, etc.
- Structure: Slabs, column, beams, and floors
- Architectural: Walls and windows
- Plumbing installation
- Electrical installation: Electrical wire chases, electrical wires, electrical switches, electrical outlets
- Finish: Plaster, paint, sealant, tiling, doors
- Landscaping and lot planning: Lot leveling, access paths, landscaping
Site Prep
The site preparation phase consists of all tasks necessary to make the land ready for workers to move around on easily, live on (in some cases), and build on.
Specific points your construction crew will probably prepare are:
Dirt fill: if your lot is former rice field or lies heavily below the road level, subak/canal level, or the flood level, your construction will start with hauling in trucks of fill dirt with 9 cubic meter pay loads. Count on this costing 800k IDR to 1jt per truck, and 4 laborers to spread the dirt costing 400k to 600k IDR per truck load
Access road: If your lot is former rice field area, prone to muddiness when the rain hits, or has generally soft ground, the next step will be laying a rough access road with crushed limestone, rubble, or loose rock. Count on this costing 1jt per meter long in a width that will accommodate construction trucks
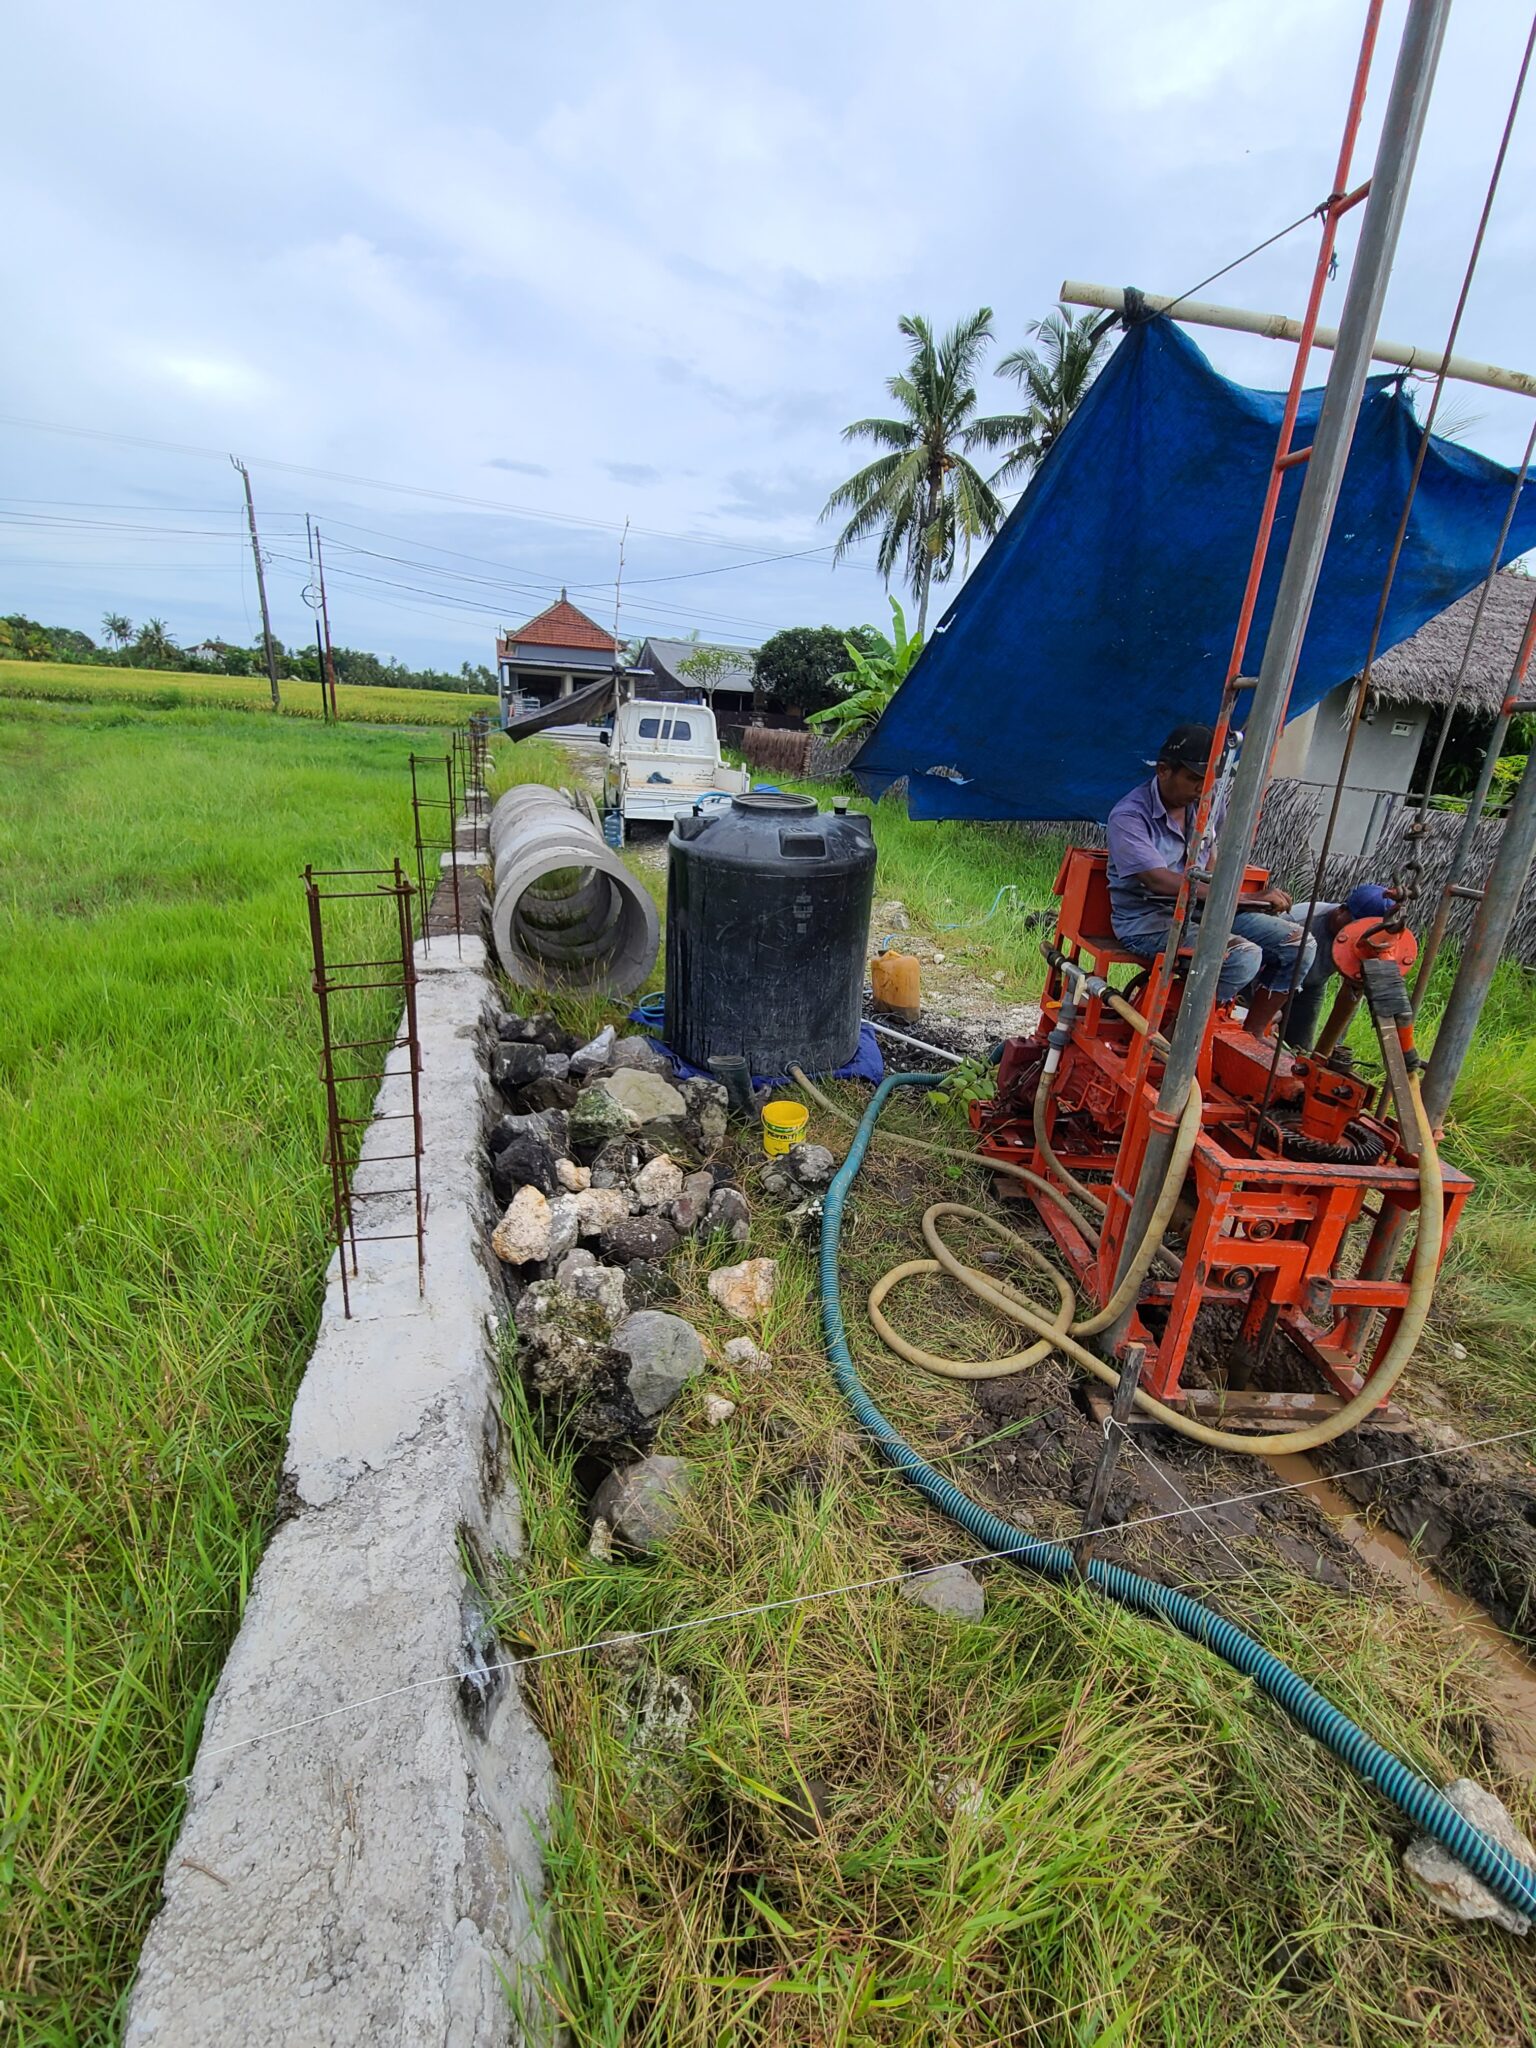
Well or water access: Your team will need a steady supply of water for the construction (washing, mixing cement) and for living on the site. If there is not a government water hookup immediately available, you will need pay an additional cost to have a well drilled. This water will not be drinkable (potable), and you will likely want to have a water test done and look into a water filter to reduce the sulfur smell (from iron) and calcium (that corrodes surfaces) that is common in the volcanic water of Bali
Septic: As public sewage waste manage isn’t available in most places in Bali, you will need to have a septic tank installed at the beginning of the project for placement and for the use of your workers.
Worker’s house: In Bali, most construction workers are migrant workers from other islands in Indonesia that travel to Bali for work, save as much as possible, and send the money home. Because of this, most workers will prefer to build a shanty house (think, plywood house and bathing area) and live on the property for the duration of the project. You will have to pay for this construction and it will be included the BOQ
Electricity: Your construction team will need electricity to power tools for the duration of the project. Some contractors make it the responsibility of the owner (you) to arrange electricity. PLN (government electricity service) will not install electricity until there is a completed building with an MCB box (breaker box) and proper grounding. Your options for electricity will be to purchase a generator or contact your neighbors and ask about using their electricity. Keep this in mind when you are chatting with neighbors about your upcoming build.
Boundary foundation wall and boundary wall: At some point you will need to install a fence or wall. Building a boundary wall is not 100% necessary.
However, if you will be building on low lying land or low lying rice field in an area that will require dirt fill, you will likely require a river stone foundation or retaining wall. A properly built retaining wall, including proper drainage to the subak (drainage canal) is necessary to keep your dirt from washing away during the raining season.
Plan on a riverstone foundation wall or retaining wall that is 75cm to 100 cm tall in total to cost 250k to 500k per linear meter.
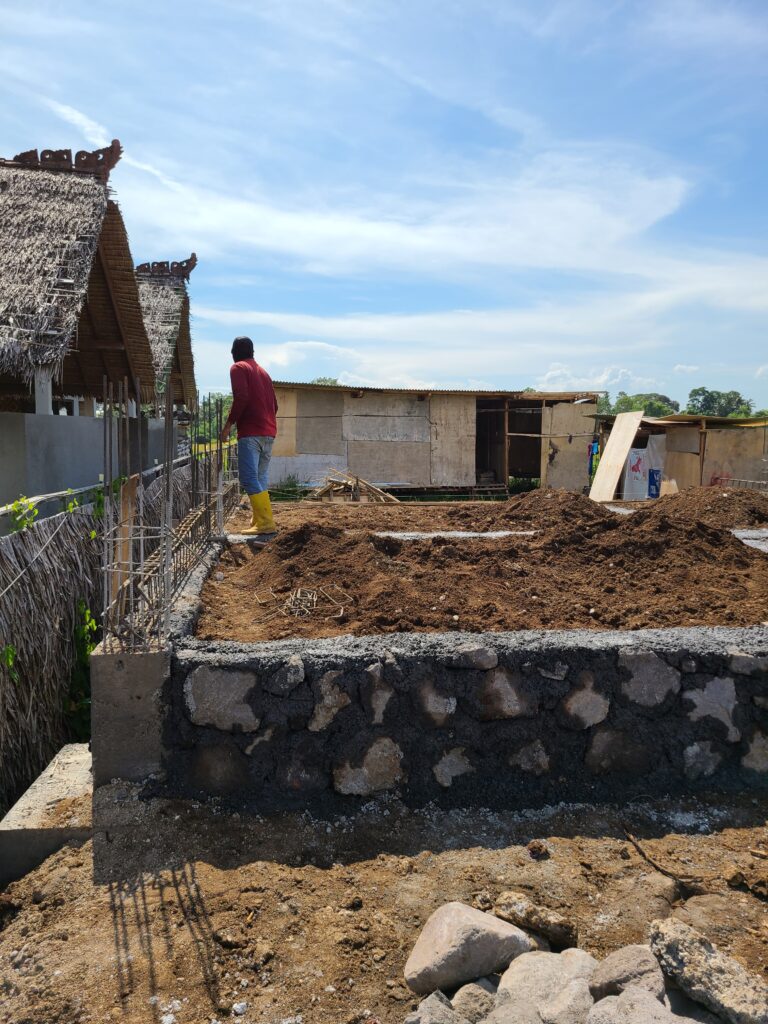
As for the boundary wall, Balinese culture and the Balinese Hindu religion prioritize having a wall or boundary around any compound for security yes but foremost against spirits. There is no law say that you must have a boundary wall, but plan on lots of questions (and nosey neighbors) if you forgo your privacy.
Once all of these elements are in place, your contractor will be ready to start construction, beginning with the substructure.
Sub-structure (Sub-floor, Bore piles, foundation Walls)
The “sub-structure” part of the construction process will consist of everything that sits below the floors, supports the building, and transmits the weight of the structure through soft soil (e.g., rice field clay) to soil or rock strong enough to support it.
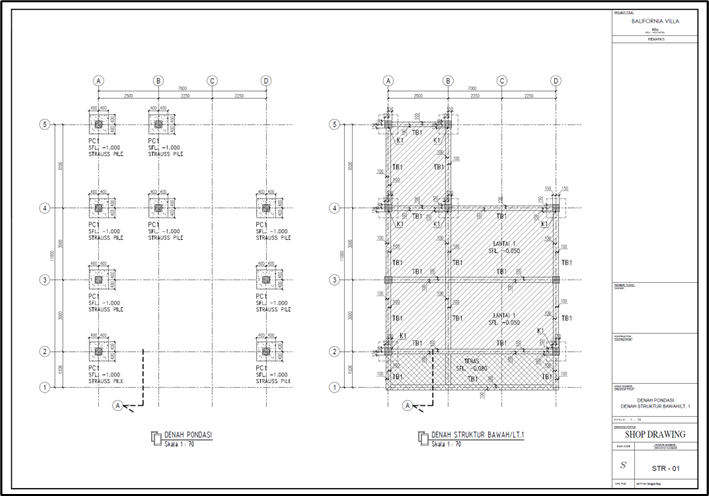
The two most important documents for this part of the process are the Soil Test and the structural drawings.
During the soil test, soil specialists bore in strategic spots (usually 3 points) below the prospective positive of the house, taking samples of soil as the bore drills further and further down. The drilling and data get returned as a report that details where (how deep) stable soil is and the weight that it can hold. The structural engineer uses this soil load capacity data to decide what type of foundation is necessary and how deep the “borepiles” need to be if necessary.
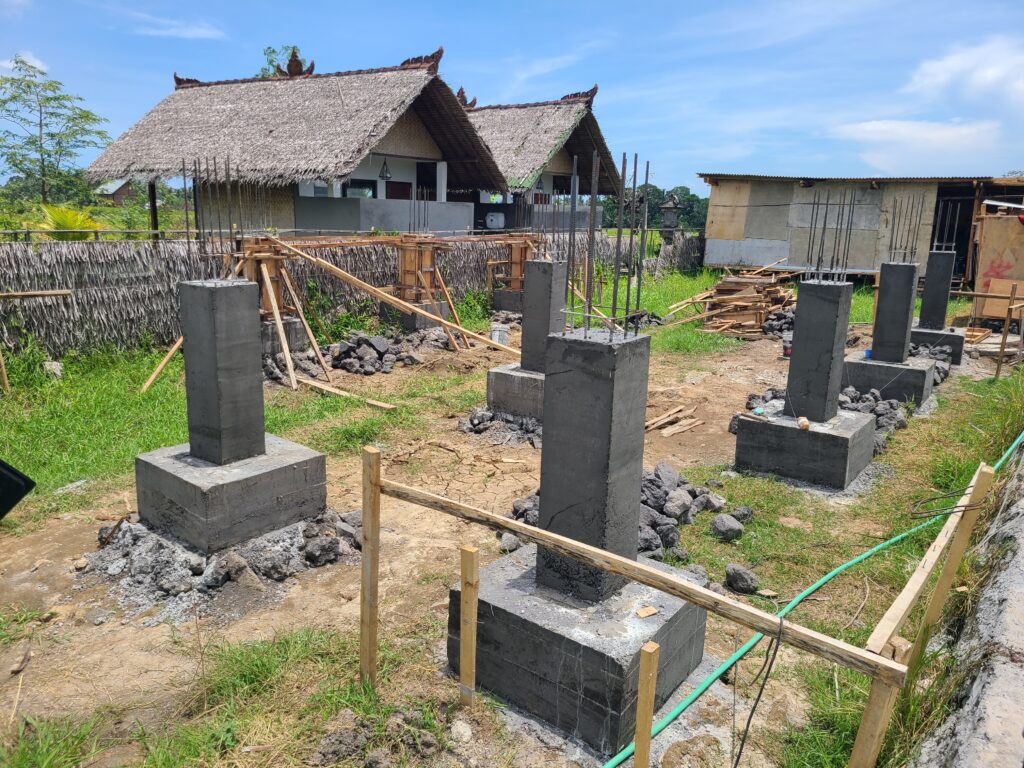
The structural engineer combines the soil data with the architectural designs to produce the structural drawings that detail the foundation, bore piles if necessary, the dimensions and makeup (steel diameter and amount, concrete diameter and amount).
However, during the sub-structure phase, the construction team willing likely drill the holes for the borepiles, place the shaped steel structures in the bored holes, fill with high density concrete, and cap the piles.
Next the construction team will likely build the river stone foundation walls to ensure the house floor (slab) sits at the appropriate elevation – to avoid flooding, rice field pests, and rising damp.
Note: Ensure your foundation wall is tall, and stone, to avoid rising damp.
After the house foundation walls are properly laid, it will be time to begin the structure – the slab, column, beams, and floors.
Structure: Columns, beams, slabs, and floors.
The structure of the building is essentially the skeleton of a good building. The structure forms a rigid, yet slightly flexibly, box that holds the house together and transmits the weight of the house down through the pile caps, bore piles and sub-foundation, into the solid rock below.
The structure of the building consists of the slab, the beams, the columns, the additional floor, and the roof.
Slab:
The slab is a steel reinforced concrete floor that is ideally poured in a single piece and sits atop the “sloof beams” that sit atop the house’s stone foundation walls.
The slab should be 10cm minimum if built on solid, rocky ground (such as in the Bukit).
The slab should be 15cm minimum if built on unstable soil or soil that expands when wet and contracts when dry (like rice field clay)
Any slab should be reinforced with meshed steel and ideally integrated in the rebar extruding from the sloof beams to form a “raft foundation” instead of a “floating foundation.”
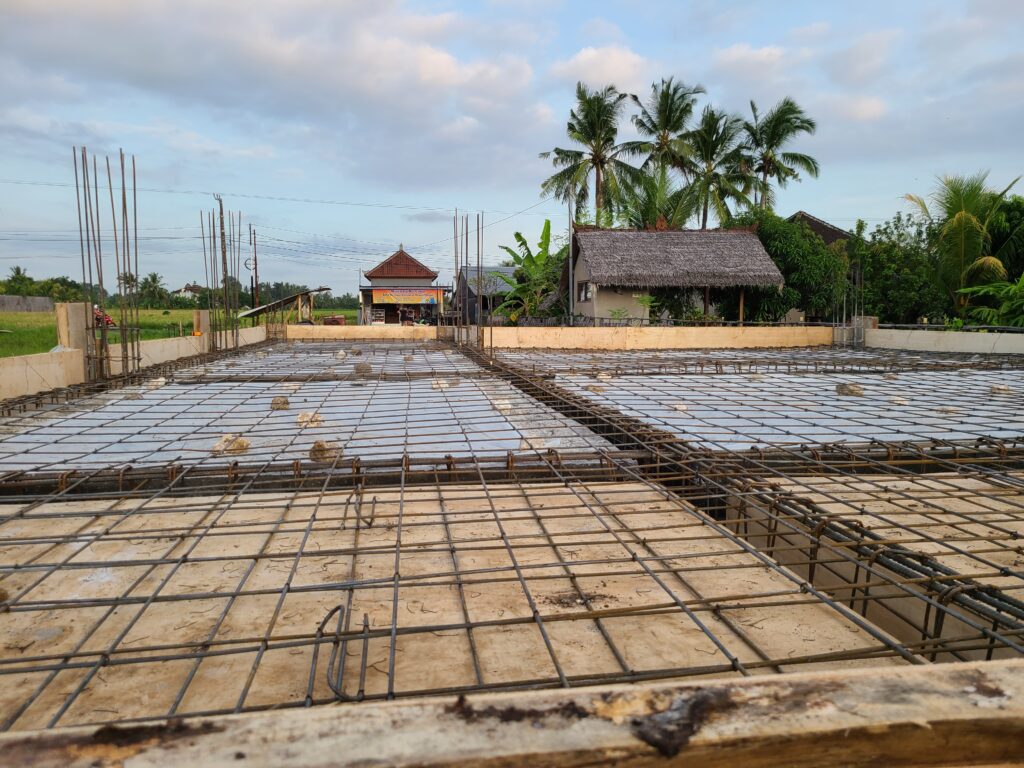
Before the concrete slab is poured, the workers will fill the void between the foundation walls with appropriate sand (with no organic matter), machine compact the sand, and then pour the concrete slab.
Beams
The beams are the latter structural elements that lay on their sides and resist loads from the tops.
These square or rectangular structures consist of poured concrete with a double layer of reinforcing steel. The dimensions of these beams as well as the size and amount of steel needed is calculated by the structure engineer and noted in the structural engineering drawings.
Columns
Columns are the vertical standing structural elements that support force at their ends.
It is imperative that structure supporting columns be design as squares, or oversized rectangles, to ensure they can withstand forces from all sides. In Indonesia, the use of “practice columns” is common, using thinner load bearing columns that can fit into the width of walls. Unfortunately, the structure of these practice columns is so thin that it puts the steel too close to the surface of the concrete column (less than 3cm depth is too little) making the steel prone to rust and snap under load.
With the beach air in Bali creating perfect conditions for rust, play it safe and ensure all columns are designing to withstand loads wall keeping steel at a minimum depth of 3cm under the concrete.
Additionally, ensure that all structural columns are intact and do not have any drainage pipes, gutters, or other objects (besides steel and concrete) running down the centers.
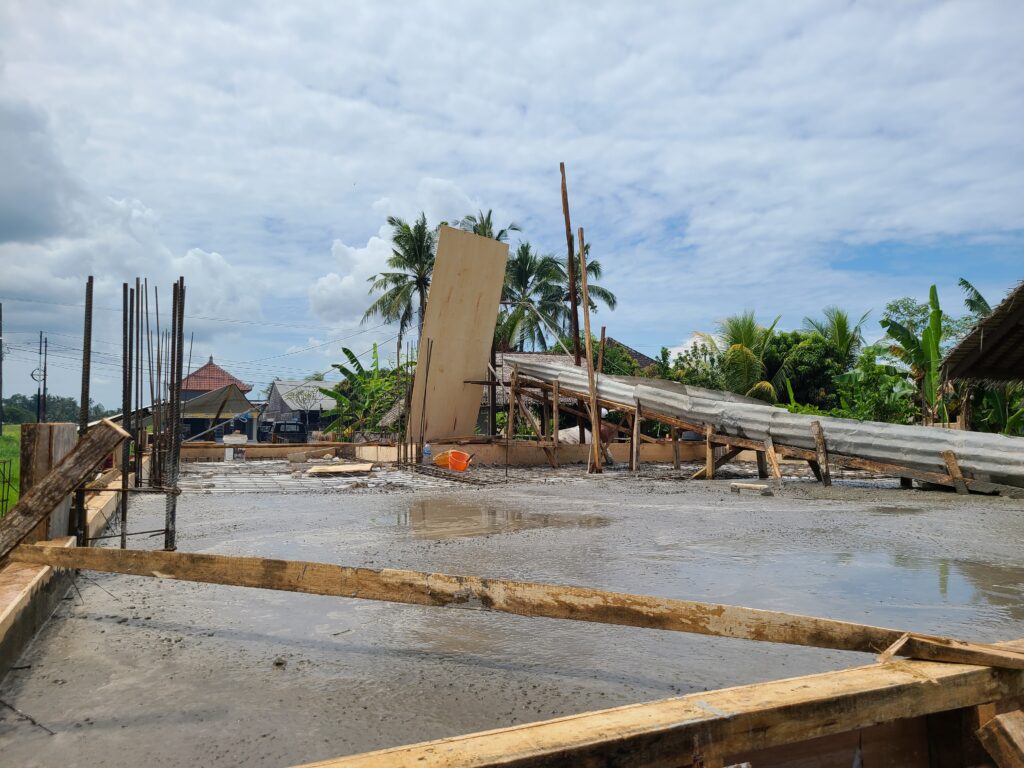
Flat Rooftops
If you are brave enough to take on the adventure of owning a flat rooftop house in Bali, the flat rooftop will essentially be poured as another floor, without additional beams or columns on top, and later to be finished.
However, if considering a flat rooftop, research all options for waterproofing (tar, screed, sika) because though I have had no problems with my roof and love it, flat rooftops not waterproofed well do not mix well with wet climates.
On my rooftop I have a bitumen membrane (asphalt) with a 25 year guarantee against leaks. In the 6+ months that we have been in our house through the rainy season, the asphalt membrane hasn’t leaked once, and I highly recommend this option.
Beware that the other common option for flat roofs in Bali is pouring the rooftop with concrete, allowing it to dry (cure) then covering with a thin layer of thinned cement, and then this painted with a “waterproofed based cement” to be waterproof. The problem is that whenever you put two densities of concrete/cement under the heating and cooling stresses of being directly under the, the thinner of the two layers will eventually crack, with the paint cracking with it. If your contractor tries to sell you on any variation of concrete + cement + a thin layer of waterproofing painted on, run. I’ve lived in and inspected villas with the rooftop waterproofing approach, with none of them being successes.
Other Rooftops: Starting the Structure
If you have chosen anything other than a flat concrete rooftop, your choice will be noted in your BOQ and architectural drawings – likely either clay tile, bitumen tiles, corrugated steel, or corrugated PVC.
Clay tile roofing in Bali can be effective, if you pay for the right quality. However, in the roofing practices in Bali, Clay tiles aren’t fixed to the roof, just held on by weight. If the wind blows too hard or a cat climbs on the roof and dislodges a tile, you get the joy of putting it back in place. Additionally, cheaper, lower quality clay tiles crack easily.
Bitumen tiles are one of the best waterproofing options in Bali. However, due to the nature of island life, quality bitumen tiles are generally expensive, but also effective.
Corrugated steel roofing is one of the cheapest and most durable roofing options and is extremely effective, however it is extremely noisy when it rains. If you are in a room during rain with a metal roof, don’t plan on having a conversation.
Corrugated PVC roofing is a newer option for roofing in Bali. However, though it is cheap, sound dampening, and more insulative that corrugated metal roofing, the blazing sun and heat of Bali tend to make the screw points of the plastic brittle, quickly resulting in leaks at screw points.
At this point in the construction process, your project will probably be declared 30% done and it will be time to pay an additional 25% payment.
Architectural: Walls, Windows, and Doors
The architectural phase of construction is when your contractor will begin installing the block walls and applying the plaster.
The walls in Bali are generally either made of two types of bricks – AAC Blocks (Autoclaved Aerated Concrete) or Batako masonry units.
Walls: Block
AAC blocks are a type of essentially baked concrete wherein cement and fine aggregates are baked with aluminum until the dough like concrete mixture rises, cools, solidifies, and is cut. The benefits of AAC are that it is 80% air, making it a better insulator, and easily cut, allowing wall adjustments to be made easily. The downside is AAC is more expensive than batako.
Batako, or standard molded concrete blocks, are the older method that has been used in Indonesia for some time.
Walls: Cement and Plastering
Once your contractors choice of brick is in place, it is time for the team to apply the finishing coats of cement, plaster, and paint.
On the bare brick, the workers will then apply a layer of fine cement (cement mix with very fine sand specifically for wall work). The team will then apply a layer of plaster (lime, gypsyum, mortar, water, and sand) and sand it smooth.
Depending on your choice of finish for the exterior, the same process will occur. During or after this process, the building will be waterproofed.
Walls: Exterior Waterproofing
For exterior walls, waterproofing protection will be necessary. Look into an integrated waterproofing and a top level coating.
An integrated waterproofing will be mixed with the layer of cement placed on top of the exterior of the bricks.
A final top layer of waterproofing can come in the form of a paint, Sika product, or some waterproof coating with mild elasticity, UV protection, and durability.
Walls: Interior Waterproofing
For interior walls, DO NOT WATERPROOF. Due to the risk of mold in Bali, due to a lack of ventilation, you will want to seal your interior walls but ensure your choice allows them to breathe. Silicon sealers or acrylic sealers are great clear options, with water based options being less toxic. Additionally, sealing interior paints are an option, but ensure the coatings are breathable.
Though we do not want water to have ways to get into the walls from outside, we still want any water that ends up in the walls to have a way to ventilate and dry – which is why we want our exterior walls waterproofed and our interior walls sealed.
Windows**
Electrical Installation
Electrical installation – electrical wire chases, electrical wires, outlets, switches, and lighting points – should all be installed according to a pre-designed MEP.
Electrical wiring installation: use proper conduit or chases or both
Ensure that despite the wiring design style you go with (exposed wiring, concealed wiring) that your wiring is contained in “electrical wiring chases” or “electrical wiring conduit”. These conduit or chases will be static, empty tubing that runs throughout your house, and into which wiring can be inserted, removed, adjusted, and inserted again.
Do not under any circumstances allow your team to put simple wires into the walls, floor, plaster, cement, or concrete, whether or not they are coated
As a reminder
- Use conduit or chases
- Do not allow any wire to be directly placed into cement or plaster
- Ensure all wiring is properly grounded
- Ensure your plan includes a lightning rod
Electrical switches and outlets positioning
Ensure that your MEP plan has clear dictation of where the electrical plugs are (position, and height), their type, and number in advance to make installation quick and easy, and the same for light switches, and installed lights.
Plumbing installation
For the sake of sanitation, ensure your plumbing map (on the MEP plan) is done by an MEP professional setting all specifications (slopes, pipe diameters, pipe configurations) to western standards.
As a checklist, ensure the following:
- All drains incorporate “P-Traps” or “S-Traps” of “U-bends” and closed systems, to prevent fumes returning from septic system
- All floor drains have “cups” that trap out stench after water has escaped
- All toilets have a floor drain next to them
- All toilet pipes are a minimum 4” to allow flushing of toilet paper
- All wash basins and floor drains minimum 2”
- MEP designs should have no “sharp bends” in pipes and instead use 2 x 45 degree bends, and a straight line to outside
- Drainage and sewage pipe slope should be 2% (2cms per meter)
- Drainage pipes should include cleanouts
- Ensure that rain gutters do not drain into the septic tank. Piping rainwater into septic tanks is common in Bali, and will cause your septic tanks and toilets to overflow. Do not do this.
Finishing
After the foundation, structure, walls, plaster, windows, and doors have been put in, its time for “finishing.”
Fixtures, polishing, surface coats of paint, and tiling/flooring will all go in at this time. Also, brace yourself, because this stage will last 10 times longer than promised.
I have at least 20 friends who’ve built villas and in not one villa have the contractors actually finished. In every single case the owner simply got so sick of the contract continually pushing back the deadline that they told the crew to leave and moved in with the house not completely finished. This includes me.
I made the entire workforce leave my house with the walls unsealed, moved in, and sealed them myself. While a friend was having friends help him move in, the workers were actually painting the walls. Other friends have shown up to find fixtures missing and sections of flooring missing.
So, this section, on finishing, is the worst section of this post because no one I know moved into a completely finished villa.
Installation of appliances and fixtures
Air conditioners, booster pumps, stove tops, and all other large appliances will be installed in the finishing phase. Unless you want to spend 2 months cleaning dust off of these, ensure these aren’t installed until the work is actually done.
The same is true of fixtures, faucets, and anything with a nice finish. Do not have it installed until the work is done, or you will end up with cement or paint stains on your $200 faucet head
Tip: buy all large items on your own
For luxurious items like terrazzo bath tubs, rain shower heads, and teakwood bath matts, source the items on your own to save tons of money. Throughout our house we have custom terrazzo sinks and a terrazzo bath tub. By sourcing ourself we paid just under $200. Our original contractor bid offered to purchase these for $1500.
For small items, let them do the leg work. For large items, source yourself to get higher quality for cheaper
Landscaping
The beauty of the tropical climate of Bali is that everything grows so quickly and there are so many beautiful plants.
Though you could hire your contractor, and end up paying twice the cost, simply map out the sections of your yard that you want plants, and either hop on Instagram and look up a gardener, or ask around your village for a local garden. Then, let them come by and tell you what plants they have on hand and recommend for the climate.
This is by far the best way to get your garden landscaped for a cheap price with low maintenance plants.
With that final step, you (hopefully) have yourself a house!! Or at the very least you understand the process of how to build a house.
But, nothing happens as you expect in Bali. Because the construction process will likely be full of “wonderful” surprises, I will now share the common “surprises” that everyone seems to encounter while build in Bali
THE “SURPRISES” YOU SHOULD ANTICIPATE WHILE BUILDING A VILLA IN BALI
In no particular order, I will now share the surprises you should expect during the construction process
Timelines: Always misquoted, virtually nonexistent
When I signed the contract to have my villa built, the contract said, and the contractor assured me, that my villa would be completed in 4 to 6 months. I finally “finished” one year after the project started.
Some friends have a villa in progress that was supposed to take six months and be done the first week of February. It is now April, and I the walls are still open.
For whatever reason, time is never quoted right on Bali, so do not plan on being in a rush. To be safe, double your timeline, and under no circumstances plan on a house being fully complete before 9 months.
Additionally, be sure your contract has late completion penalty clauses.
Also be aware that, as Indonesia is a Muslim country, all construction will virtually stop during the month of Ramadan.
Work standards
“Completion standards” in Indonesia are some of the most laxed I have ever seen in the world, and they seem to slip more if no one is looking. At the end of my project, I was forced to come in daily with a measuring tape and chalk, then measure everything and mark what needed to be fixed in chalk.
Most Indonesian workers or contractors will not argue if you point out something has not been done to standard and it must be done again. However, if you do highlight the issue, they will generally not take the initiative to fix it. If no one highlights its broken, don’t fix it.
Granted, I am generalizing and my amazing Javanese foreman Tamren’s initiative saved my project many times, but err on the side of caution and check standards frequently – because one the mistake is made in concrete, it is a lot more difficult to fix.
Ask questions constantly
If you don’t understand why something is being done a certain way, ask why it is being done that way. You may learn something new, or you may uncover something that could be done better, at which point you’ll need to enforce the work standards. The bottom line is be constantly inquisitive so that issues are discovered early
Someone will always be available to do “it” illegally – think twice before accepting
When it comes to permitting, changing land zoning, installing electricity, or altering architectural drawings for permitting, there is always someone in Bali with a “friend” that can get the problem fixed illegally, with a little bit of money.
Don’t do this.
Regulations exist for a reason, and its not uncommon to get stung once the “favor” person can no longer enforce the favor paid for.
Simply err on the side of caution, avoid bribes, and contribute to Bali being a more “civil” place to live
Ensure there is clear supervision, accountability, and checking your build
Taking responsibility, accountability, and ownership aren’t popular concepts on Bali, regardless of how many managers you see, so do assume that the manager is actively managing. Check in with your contractor and foreman to ensure that they are (not being lazy) and routinely pulling out the plans for your house, checking them against the structure, and measuring
Demand to see a sample before you decide on anything, and shelf your expectations that are based on what you get back home.
Everything in Bali that can be purchased comes in several grades – export quality/excellent, good, fair, and I hope this doesn’t fall apart before I get home.
The issue is that standard things that come prefabricated and sturdy from the factory in the US, Europe, and Australia, are things that are assembled on site in Indonesia by “jacks of all trades, masters of none.”
Additionally, contractors tend to try and skim every penny by going with slightly thinner metal and slightly thinner glass and slightly thinner concrete, hoping you won’t notice. You will, just ensure its not too late.
So, for everything – windows, window frames, tiles, pavers, fixtures, lightbulbs, etc. – insist on seeing, touching, and feeling exactly what will be used on your house, so you can debate up the quality before you’re forced to pay for an upgrade after the fact.
OTHER COMMON ISSUES TO BE AWARE OF
Cracking in cement floors (not concrete floors)
If you have concrete floors that do not have relief lines cut in them ever couple meters they will crack slightly over time. This is normal.
However in Bali, contractors tend to take a very horrible approach to concrete floors with the excuse that they’ll cover them with tiles. Unfortunately, if you go for exposed concrete (like me) you won’t learn about these worst practices until its too late.
To avoid ending up with cracked floors, insist on having only steel reinforced, or steel mesh reinforced concrete, not cement. The difference between the two is concrete has larger aggregate (rock, coarse sand) that causes the material to get harder over time. Cement on the other hand is softer and easier to sand, which is why contractors in Bali use it on their floors. Use concrete floors (polished concrete, not polished cement) to avoid cracking
Additionally, be sure your slab is thick enough for your soil. The slab should be minimum 10cm to 15cm, and thicker if you are building on unstable soil (like ricefield)
Rising damp (riverstone vs. brick, elevation)
Rising damp is the phenomenon of a natural hydraulic affect in the brick of walls that causes the long holes in bricks to suck water up through bricks from the ground, like capillaries. The result is constant moisture along the floor of a wall, that eventually turns into mold that is extremely difficult to shake.
To avoid the issue of rising damp
- Ensure there is a “dampproof course” installed below the wall levels
- Consider using a river stone foundation wall instead of a porous brick foundation wall
- Ensure the floor elevation is 50cm above any potential water sources
Mold
Being in a tropical climate, count on the possibility of mold as a constant nemesis. Anytime that you have moisture without ventilation or airflow in a room in Bali, count on the fact that it will be moldy within days.
To combat this, think through every space in your home and ensure there are options for active, drying airflow (air conditioning, fans) and passive airflow (windows) to ensure fresh is always available to keep the mold at bay.
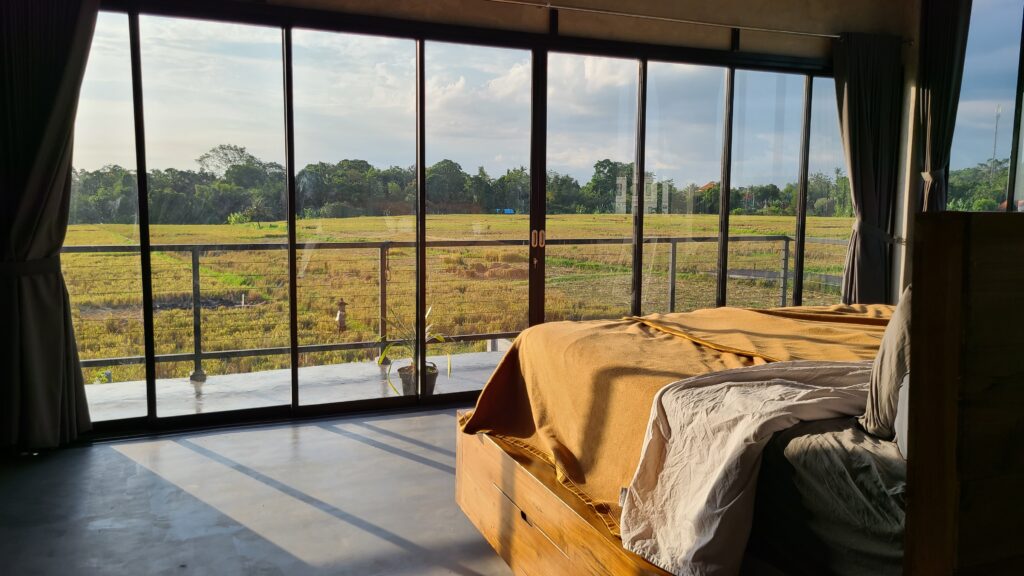
Open living
As good as it looks on Instagram, beware of open living. At night, that couch open to the night sky may seem beautiful, and trust me the snakes and mosquitoes will agree.
Instead, if you want an open space opt for sliding doors or sliding glass windows
Water sources in Bali: Well and PDAM
Whether you get your home’s water from the Bali government source (PDAM) or from a well, plan on the water being undrinkable.
Additionally, you may notice very soon in Bali that the water sometimes has a sulfurous “rotten egg” smell and can be quite hard. This is due to most well water being volcanic runoff water rich in Iron (which causes the smell) and calcium (which causes the staining). To solved for this you will have to buy a water filtration system with silica dioxide that removes iron, carbon packs that remove flavor, and salts (recharged roughly every 2 weeks) that neutralizes the calcium
Plan on this system costing 16jt to 20jt for the riskily cheap options, and 30jt to 35jt for a reliable home water filtration option.
Note that the water will still not be drinkable after this process.
Water tanks
Every home in Bali has a water tank, and yours will too. Do yourself a favor and buy an easy to drain, conical water tank like the Penguin water tank or Mpoin.
From there, be sure to check the inside of your water tank monthly, and clean it once every 6 months at least.
Booster Pumps
To improve the water pressure in your home, you are going to want to install a “booster pump.” This booster pump will sense anytime a faucet is open and pressurize the water, giving you good flow and a fantastic shower.
The downside of these is their high pitched whine when operating. Simply be aware that these pumps can be noisy, so place the booster pump somewhere outside of your house accordingly.
NEXT IN THIS SERIES ON HOW TO BUILD A VILLA IN BALI
HOW MUCH DOES IT COST TO BUILD A HOUSE IN BALI
- Hypothetical Villa Estimate Costing
- The Real World Cost of Building a House in Bali: 3 Villa Construction Case Studies, and Prices
- The Process of Building Your Own Villa in Bali: A Quick Overview
- Step1: Finding Land for Sale in Bali
- Step 2: Conduct a Due Diligence Check
- Step 3: Understanding Buying (Leasing) Land for Builds in Indonesia
- Step 4: “Buying” Land in Bali (Leasing land long term): Signing Contracts and Paying
BALI VILLA DESIGN AND PLANNING PROCESS: ARCHITECTURAL, STRUCTURAL, INTERIOR DESIGN, AND MORE
- Step 5. Planning Your Villa Build and Drawing the Plans
- Understanding the Types of Construction Plans and Tests You’ll Need
- Average planning document costs
- Why are these plans important?
- My Experience Planning my Villa + Some Tips to Avoid My Disaster
- The Professionals You Need to Hire and Consult in the Design Process
- List of Elements to Think through in Your Villa Design
- Step 6: Properly Permitting the Build of Your Villa
Other Great Articles in the Moving to Bali Series
- Moving to Bali: A Complete Guide
- The Bali Digital Nomad Visa: A complete guide
- 73 Awesome Cafes in Canggu
- The Best Bali Coworking Spaces
- Things to do in Canggu
- The Best Sunset Points on Gili Trawangan
- Buying a House in Bali
- Buying Land in Bali
- Building in Bali
- How much does it cost to build a villa in Bali?
- Bali villa design and planning process
Other Great Nomad, Travel, and Expat Lifestyle Articles
- Moving to Malaysia: A Complete Guide
- The Ultimate Malaysia Digital Nomad Visa Guide
- Thailand Visa Exemption Essentials: What to know before your trip to Thailand
- The 51 Best Digital Nomad Jobs among Successful Nomads
- 9 Epic South America Backpacking Routes
- Backpacking the World…2 Weeks at a Time
- Is Geoarbitrage for You? An Ultimate Guide to Living Better for Cheaper as a as a Nomad
.

.
ABOUT THE AUTHOR
Carlos Grider launched A Brother Abroad in 2017 after a “one-year abroad” experiment turned into a long-term life strategy. After 65+ countries and a decade abroad, he now writes about FIRE, personal finance, geo-arbitrage, and the real-world logistics of living abroad—visas, costs, and tradeoffs—so readers can make smarter global moves with fewer surprises. Carlos is a former Big 4 management consultant and DoD cultural advisor with an MBA (UT Austin) and Boston University’s Certificate in Financial Planning. He’s the author of Digital Nomad Nation: Rise of the Borderless Generation and is currently writing The Sovereign Expat.